Surveys
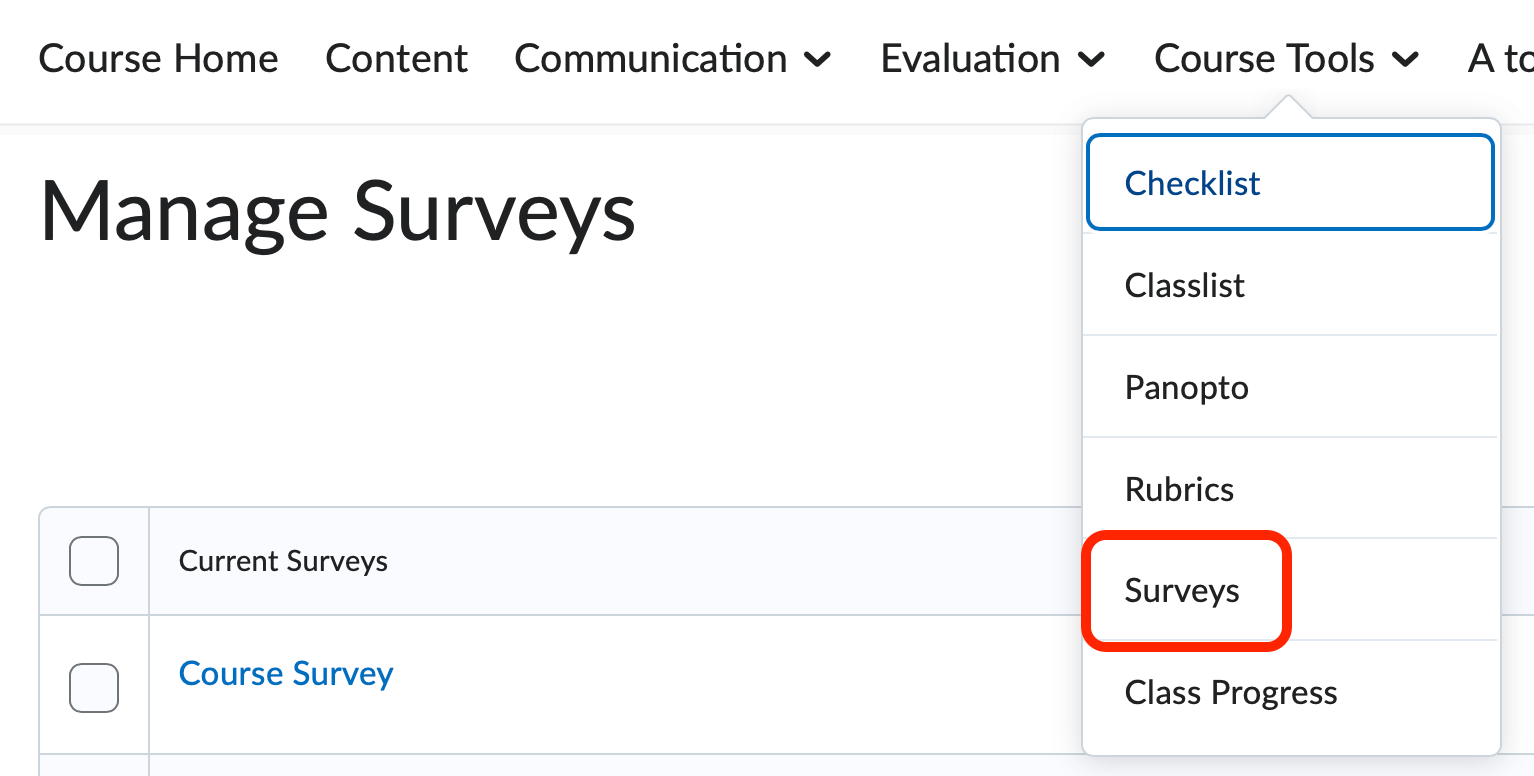
To access the Survey tool, from the Course Nav Bar expand Course Tools and select Surveys.
The Surveys tool allows you to capture feedback from your students regarding a particular content topic or feedback on the overall course. Surveys in D2L are not a replacement for SAI or other official university reporting mechanism. The Survey tool functions are closely related to the functions of the Assessment tool. Unlike Assessments, surveys cannot be tied to the gradebook nor can you give students feedback on survey attempts. If you would like to provide feedback to your students on survey attempts, you may want to consider creating an ungraded assessment instead. Visit the Assessments page to learn more about creating quizzes, both graded and ungraded.
Creating Questions
When creating surveys, a best practice is to begin in the Question Library. The Question Library is a question repository shared across the Assessment tool and the Survey tool.
To navigate to the Question Library, Click the Question Library menu option located on the Manage Surveys page.

The Question Library is divided into two frames. The Left-Frame holds the tree-structure of your question sections (or folders). The Right-Frame will display your question sections (folders) as well as any questions not belonging to a specific folder.


From this page, use the New and Import buttons to begin creating questions and sections. Use the menu buttons to Move, Delete, Reorder, and Edit Values for the questions and sections.
When you've completed your questions, click the Done Editing Questions button on the far right to return to the Manage Surveys page.

Click on a question type to view detailed instructions for creating a question:
-
Sections (Folders)
Sections act as folders within surveys and the question library. It is a good practice to organize your course materials. Sections can aid that organization.
- Enter a Section Title. Note that, by default, students will see the section name unless you check the hide
option.

- The Section Text field displays below the section name and will be seen by students unless turned
off.

- Optional: Use the Insert Image button to insert an image above the section.

- Alternative Text – If you selected an image with the Insert Image button, add a short description of that image in this textbox.
- Display Options:

- Check the shuffle questions in this section to shuffle sections and question pools in this section.
- Click Save to return back to the Question Library.
- Enter a Section Title. Note that, by default, students will see the section name unless you check the hide
option.
-
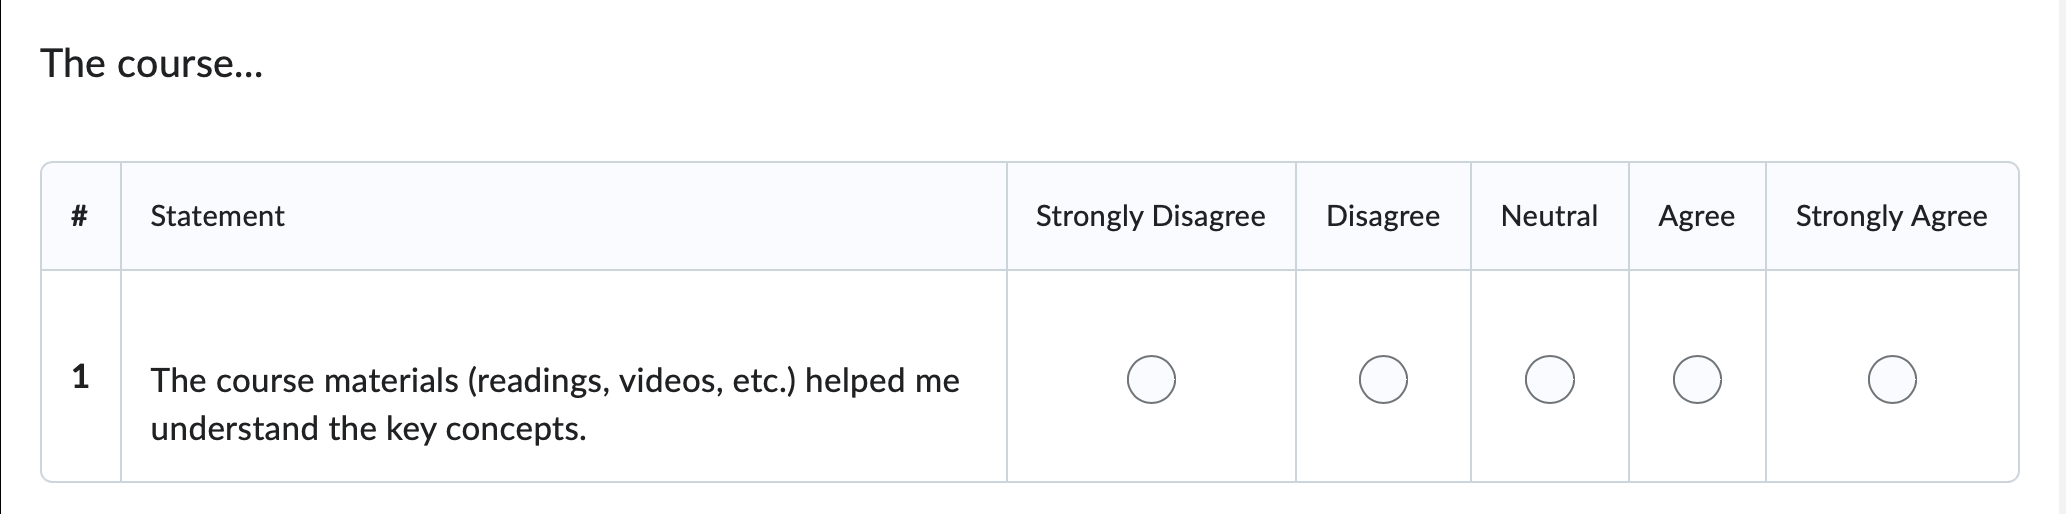
Likert
The Likert question type will allow students to select a rating from a rating scale as a response to a single question or statement.
Follow these steps to create a Likert question:
- Optional: Enter a question title. If you do not enter a title, D2L will inherit the first line of the question text
as the Question Title. Note that only the Question Title displays on the Properties tab of Edit Survey. Also, similar question titles will assume a numbered naming convention (e.g. Which
of the follow1; Which of the follow2).
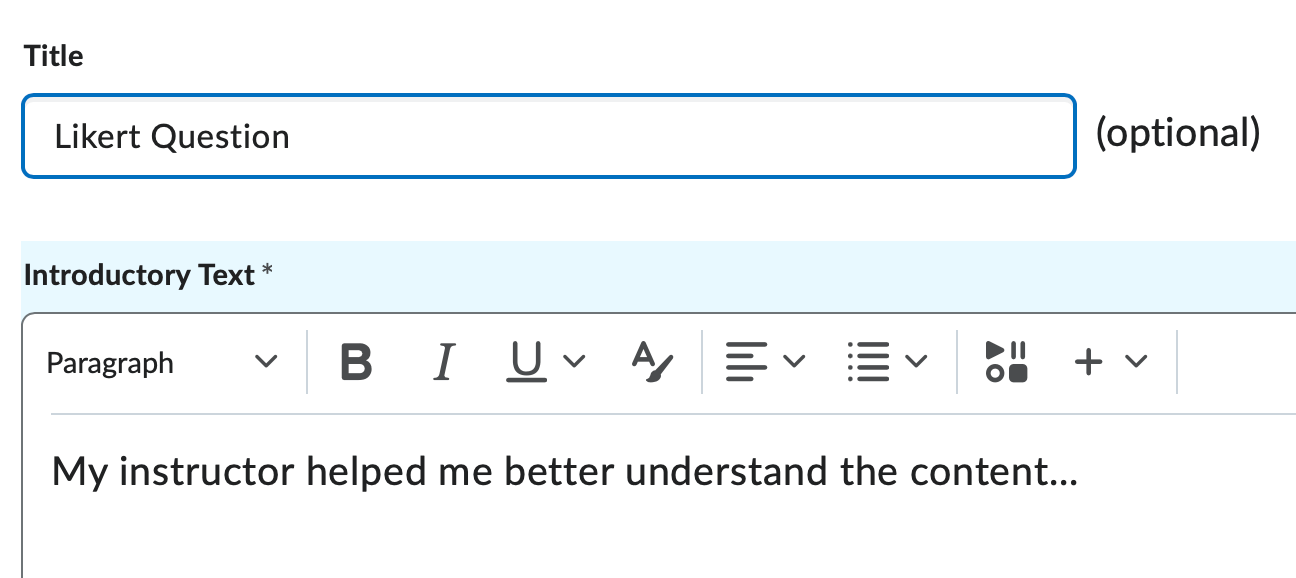
- Enter the actual question or question prompt in the Introductory Text textbox.
- Use the Insert an Image button to insert an image above your question text.

- Description – If you selected an image with the Insert an Image button, add a description of that image in the Alternative Text textbox.
- Question Scale - Select a question scale from the list of options:

- One to Five (1 - 5)
- One to Eight (1 - 8)
- Agreement Scale (Disagree - Agree)
- Satisfaction Scale (Dissatisfied - Satisfied)
- Frequency Scale (Never - Always)
- Importance Scale (Unimportant - Important)
- Opposition Scale (Oppose - Support)
- Include an N/A option for each value by marking the Include an N/A option checkbox.
- The Answer Options table allows for you to perform the following actions:
- List the Statements/Questions in the Value column. By default D2L presents two value rows. If your likert question needs more rows,
click the Add Option button, located above the table.

- List the Statements/Questions in the Value column. By default D2L presents two value rows. If your likert question needs more rows,
click the Add Option button, located above the table.
- Optional: Enter Question Feedback. Question feedback displays to the student after they have submitted an attempt, regardless of the answer option selected.
- Choose a saving option:

- Save – Saves the current question and returns you back to the collection root folder.
- Save and Copy - Saves the current question and displays a new, exact copy of the now previous question.
- Save and New - Saves the current question and displays a new, blank question of the same question type.
- Preview – Displays a preview of how the question will appear to students. This action does not save any changes made to the new question screen.
- Cancel – Discards all changes.
- Optional: Enter a question title. If you do not enter a title, D2L will inherit the first line of the question text
as the Question Title. Note that only the Question Title displays on the Properties tab of Edit Survey. Also, similar question titles will assume a numbered naming convention (e.g. Which
of the follow1; Which of the follow2).
To view information on the other question types available in the Question Library, visit the Assessments page.
Creating Surveys
To create a new survey, click the blue New Survey button. You will be redirected to the Edit Survey page. This page is divided into four tabs. Each of these tabs contain information related to creating surveys.

-
Properties
After clicking the New Survey button you will be brought to the Edit Survey Page, Properties Tab. The Properties tab holds your survey name, survey questions, description and submission messages, as well as the ability to categorize the survey and/or make the results anonymous. Populate all of the necessary fields on this tab before moving forward in the survey creation process.
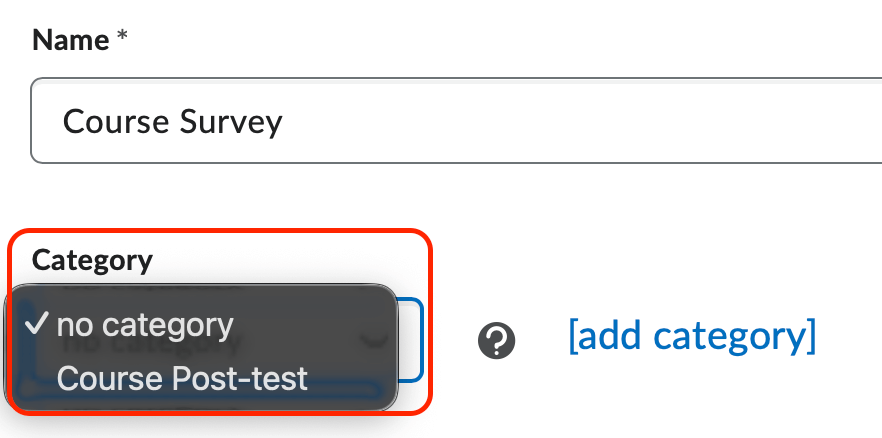
- Enter a Survey Name.

- If you prefer that students receive feedback while completing the survey, click the
Feedback option.

- Click the Anonymous option to make your survey completely anonymous. Note that D2L will not track student progress if this option is checked. Also, this setting
cannot be changed once the survey has been created.

- Survey Questions - Click the Add/Edit Questions button to create questions for the survey or to import questions from the Question
Library.

- Optional: Enter information into the Description and Submission Message sections. Information entered in the Description will appear to the student on the Survey Summary page, before the student begins the assessment. Note that if you choose to populate either of these fields, you must select the ON radio button for the information to display. The Submission Message displays to the students after they have submitted the survey. The default message is "You have successfully submitted the survey."
- Optional: Enter information into the Page Footer section. Information entered in this textbox will appear to the student along the bottom of the survey question page(s). Note that if you choose to populate this field, you must select the ON radio button for the information to display.
- Click Save and then navigate to the Restrictions tab.
If you do not see textboxes for the Description/Submission Message or Page Footer click the Expand hyperlinks.
- Enter a Survey Name.
-
Restrictions
The Restrictions tab holds all information regarding when and how participants access your survey.
- Select a survey Status. By default surveys are Hidden. Students cannot see inactive surveys. Unchecking the box Hide from Users will allow students to see the link to the survey. Remember that there is no way to
automate this change. It is recommended that if you are using Start and End Dates, go ahead and unhide your survey to students. If the survey is Hidden it will remain invisible to students despite any start and end dates set.

- Optional: If you are planning on setting date and time parameters, complete the Availability section:

- Start Date - sets the earliest date and time that a participant will be able to begin the survey. To set a start date check the Has Start Date box and set a date and time.
- End Date - sets the latest date and time that a participant will last be able to begin the survey. To set an end date check the Has End Date box and set a date and time.
- Optional: Release Conditions - Creating release conditions control which criterion students must meet in order for D2L to release the survey to that student.
- User Responses - Select the number of attempts you will allow for each student by selecting a number from the Attempts Allowed dropdown menu.
- Optional: Advanced Availability -To provide specific participants with availability and time limits for the survey
that are different from the rest of the class, click the Add User to Special Access button. Use this feature for students who require longer examination times or for
students who missed the initial survey dates.

- Allow selected users special access to this survey - Selecting this option will allow students with special access to open the survey
outside of the regular restrictions you set previously without affecting the rest
of the class and their access.
- Allow only users with special access to see this survey -Selecting this radio button will allow ONLY students with special access to open the survey outside of the regular restrictions you set previously. Your remaining classlist will NOT be able to access the survey.
- Allow selected users special access to this survey - Selecting this option will allow students with special access to open the survey
outside of the regular restrictions you set previously without affecting the rest
of the class and their access.
- Click Save and navigate to the Objectives tab.
- Select a survey Status. By default surveys are Hidden. Students cannot see inactive surveys. Unchecking the box Hide from Users will allow students to see the link to the survey. Remember that there is no way to
automate this change. It is recommended that if you are using Start and End Dates, go ahead and unhide your survey to students. If the survey is Hidden it will remain invisible to students despite any start and end dates set.
-
Objectives
Optional: Click the Associate Learning Objectives button to attach learning objectives to the survey.

-
Reports Setup
Create reports to gather survey results statistics.
- Click the Add Report button.

- Select a Report Type.

- Summary Report:
- Show Aggregate Data - Displays summary data for: MC, TF, LIKERT, M-S, ORD, MAT
- Show Text Responses - Displays individual responses for: LA, SA, FIB, MSA
- Individual Attempts:
- Hide User Information - Do not display the user's First Name and Last Name when viewing Individual Attempts.
- Summary Report:
- Release - Select a date to release the report.

- Select the Role(s) this report is available. Note that you must select Instructor Role to be able
to view this report.

- Click Save.
- Click the Add Report button.
Managing Surveys
-
Create a Survey Category
Use categories to better organize the different types of surveys available to your students.
To Add a Survey Category:
- From the Manage Surveys page, click the Edit Categories button.
- Click the Add Category button.

- Enter a Category Name in the Name column.
- Optional: Enter a Sort Order. Sort order will control the order of the categories on the Manage Surveys page.
- Click Save and Close.
You can also create a category from within the Edit Survey Page.
- From the Manage Surveys page, click either New Survey or select Edit from a preexisting survey's context menu.
- For the Category option, select a preexisting category or click the add category hyperlink to create a new category.
To Delete a Survey Category
- From the Manage Surveys page, click the Edit Categories button.
- Mark the checkbox to the left of the category or categories you would like to delete.

- Click the Trashcan Icon.
- Click Save and Close.
- From the Manage Surveys page, click the Edit Categories button.
-
Reorder Surveys
Control the order your surveys appear with the Reorder option.
- From the Manage Surveys page, click the More Actions button and select Reorder from the dropdown menu.

- Select a number in the in the Sort Order dropdown. Note that the sort order will dynamically update with each sort order number
you select or change.

- Click Save and navigate back to the Manage Surveys page.
- From the Manage Surveys page, click the More Actions button and select Reorder from the dropdown menu.
-
Copy a Survey (Create a Duplicate Survey)
Create a duplicate survey by using the Copy feature.
- From the Manage Surveys page, click the More Actions button and select Copy from the dropdown menu.
- Select a preexisting Survey to Copy from the dropdown menu.

- Enter a New Survey Name. Note that the default name will be Copy of ____.
- Select to Hide from Users. Note that students cannot see surveys if this box is checked.
- If you would like to be automatically redirected to the Edit Survey screen of the duplicate survey, check the Edit Survey after copy completes option.
- Click Save.
- From the Manage Surveys page, click the More Actions button and select Copy from the dropdown menu.
-
Delete a Survey
Delete a survey by using the Delete feature.
- From the Manage Surveys page, click the More Actions button and select Delete from the dropdown menu.

- Mark the checkbox of the survey(s) you would like to delete.
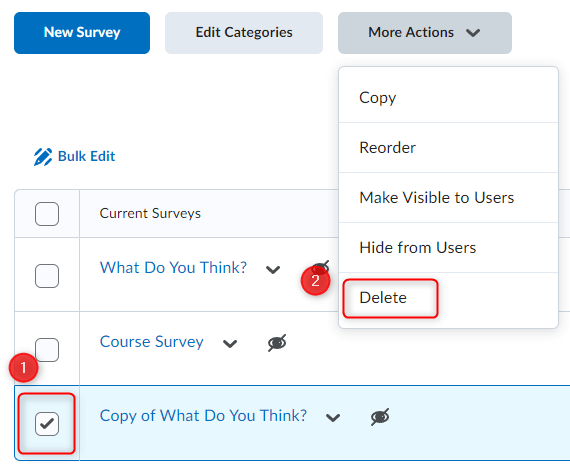
- Click the Delete button.
- Click Cancel to return to the Manage Surveys page.
- From the Manage Surveys page, click the More Actions button and select Delete from the dropdown menu.