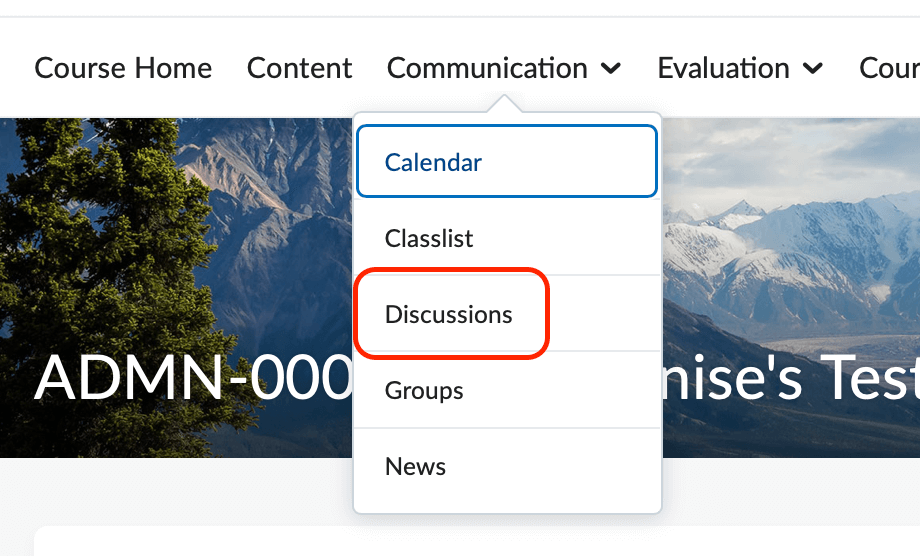
Accessing Discussions
To open the Discussions tool, click on Communication or Evaluation in the default course NavBar and then select Discussions.
-
Creating Discussions
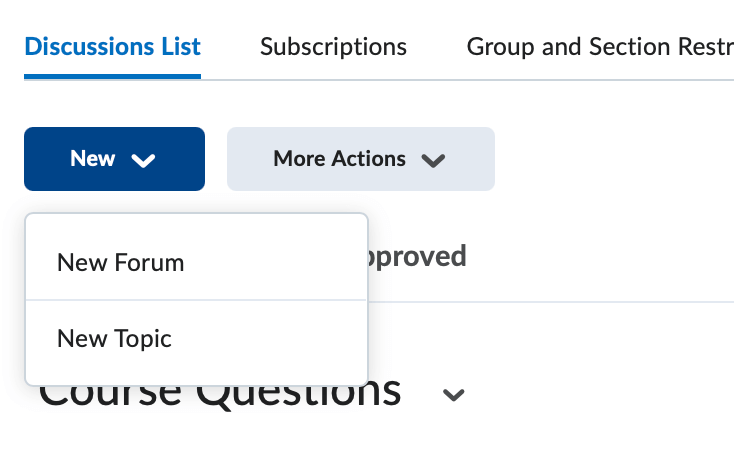
Adding a Forum
You will need to create a Forum in order to create Topics. Students will post/respond to topics. Note that any restrictions you place on the forum level will be inherited by all of the topics within that forum. For example, placing availability or locking dates on the forum level will open and close all of the topics within that forum, overriding any dates you may have placed on the topics themselves.
- Click the New Button and select New Forum from the drop-down menu.
- Enter a Title and (optional) Description.
- Select the appropriate Options:
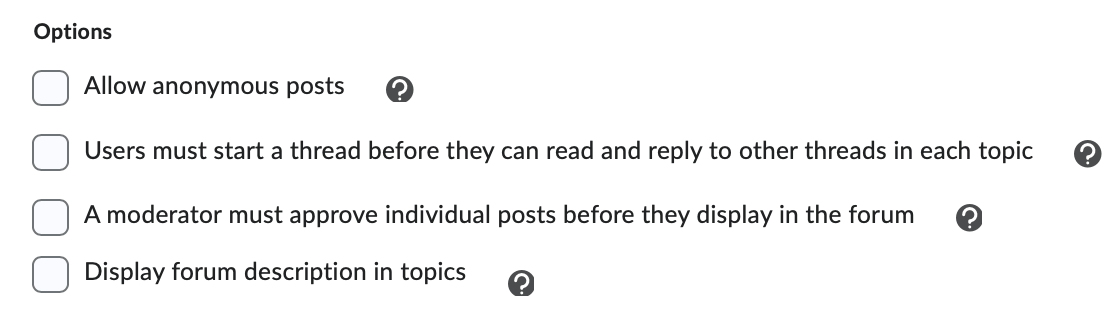
- If you allow students to be able to post anonymously, be sure to check the Allow Anonymous posts checkbox.
- To require a student to post a thread before being able to view other threads, select the Users must start a thread checkbox.
- If you would like to approve messages before they are posted, be sure to check the check box labeled A moderator must approve...
- The Availability options will allow you to change when or if the students can view and access the
forum.
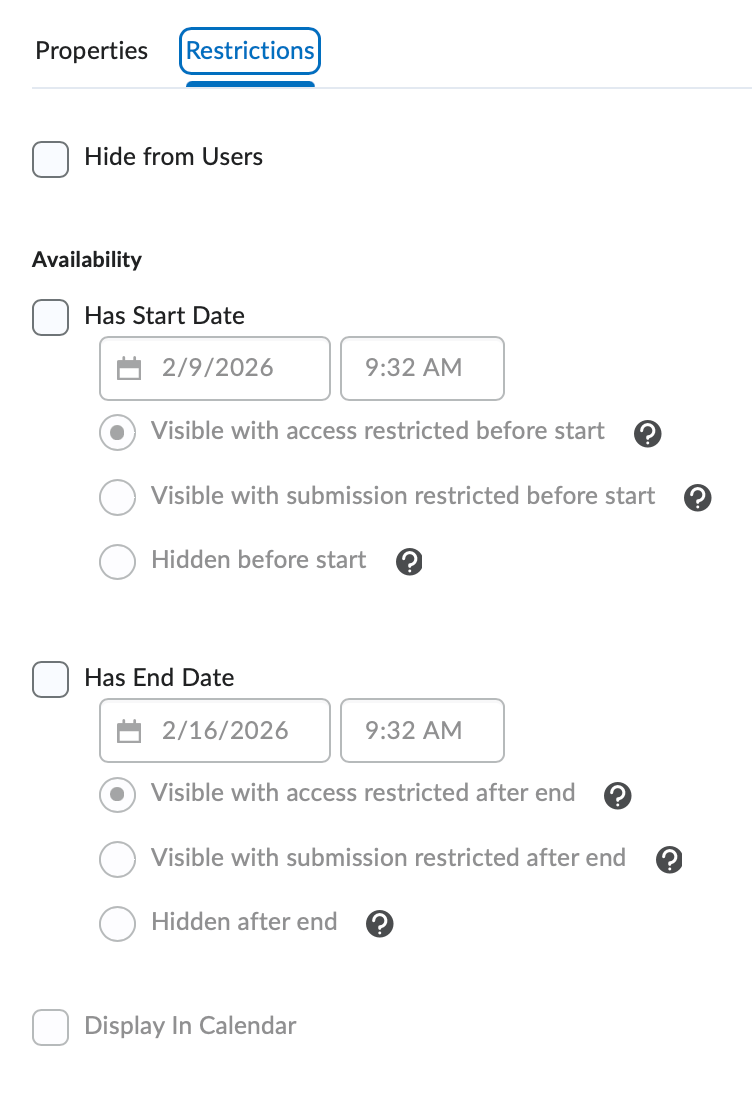
- The Hide from Users option will allow you to hide the forum from the student's view.
- The Start and/or End Date will allow you to set the discussion forum to appear and disappear from student's view on certain dates you set.
- Start and End Dates have multiple visibility options.
- Visible with access restrictred before start allows the students to see the forum, but not access it.
- Visible with submission restricted before start will allow students to view the discussion board information without being able to post.
- Hidden before start/after end will hide the board entirely from users.
- Be sure to Save and Close when finished or select Save and Add Topic to begin adding topics to this Forum.
Adding a Topic
You will need to create a Forum before you can create Topics.
- Click the New Button and select New Topic from the drop-down menu.
- Enter a Title.
- Click on Change Forum.
- You may have to create the Forum at this step if you previously did not create one.

- You may have to create the Forum at this step if you previously did not create one.
- The Grade Out of section allows you to attach or create a grade item.
- Enter a number in the grade out of points box.
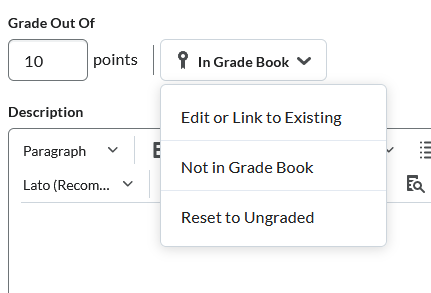
- Edit or Link to Existing will allow you to create a new grade item or attach to an existing grade item.
- To reset the item or disconnect it from the grade book, click on Reset to Ungraded.
- Enter a number in the grade out of points box.
- Optional: Add a Due Date.
- Add a Description (optional).
- The Availibility Dates & Conditions section options will allow you to change when or if the students can view the topic.
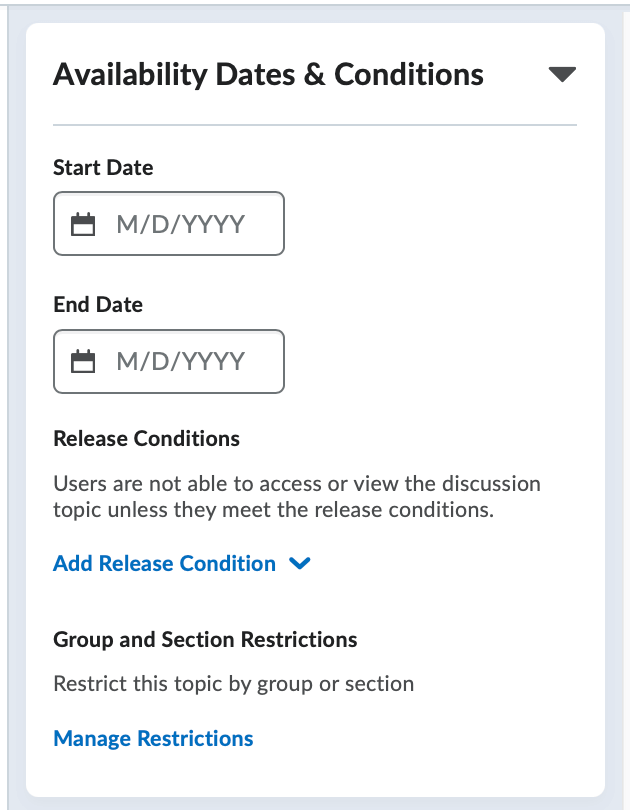
- The Start and/or End Date will allow you to set when the discussion topic will be accessible.
- The Availibility section also allows you to add Release Conditions to the Topic, or to set any group restrictions on a topic or forum. View the Groups Tool to learn more about automatically creating group-restricted discussion topics.
- Select the appropriate options under Post & Completion:

- If you allow students to be able to post anonymously, be sure to choose Allow learners to hide their name from other learners.
- To require a student to post a thread before being able to view other threads, select the Learners must start a thread...
- If you would like to approve messages before they are posted, be sure to check the check box labeled Post must be approved before they display in the topic.
- The Evaluation & Feedback section will allow you to attach rubrics, learning objectives and change evaluation
settings.

- Be sure to Save and Close when finished.
Once you have added a Topic, your Discussion Forum will now be visible and the students will be able to post threads.
- Click the New Button and select New Forum from the drop-down menu.
-
Participating in Discussions
Posting a Thread
You will need to have created a Forum and Topic in order for you and your students to be able to post a thread. A Thread is a response to the Topic.
- From the Discussions List page, click on the Topic of your choice.
- Click the Start a New Thread button.
- Enter your Subject and a Message for the Thread.

- To ensure that your thread stays at the top of the topic, check the Pin thread box.
- Remember that D2L will, by default, subscribe you to every thread you create. To turn off these notifications, simply uncheck the Subscribe to this thread box.
- Click the Post button to save your thread and post it to the Discussion Topic.
-
Grading Discussions
The Grade Out Of option will allow you to grade a discussion topic should you choose to do so. Turning the discussion into a graded item is similar to other tools in D2L, such as the Dropbox or Assessments.
To turn on the grading feature within a discussion board topic:
- Navigate to the Edit Topic page.
- Click on Ungraded to launch the edit or link to existing menu.

- Choose Create and Link to an new grade item if you need to create a new one. *Note: this will auto populate with the discussion title. Choose Link to an existing grade item to attach it to a grade item you've already created.
- Enter a number in the Grade Out of text box. This number should be the maximum number of points a student can earn on this particular topic.
- Be sure to Save and Close when finished.
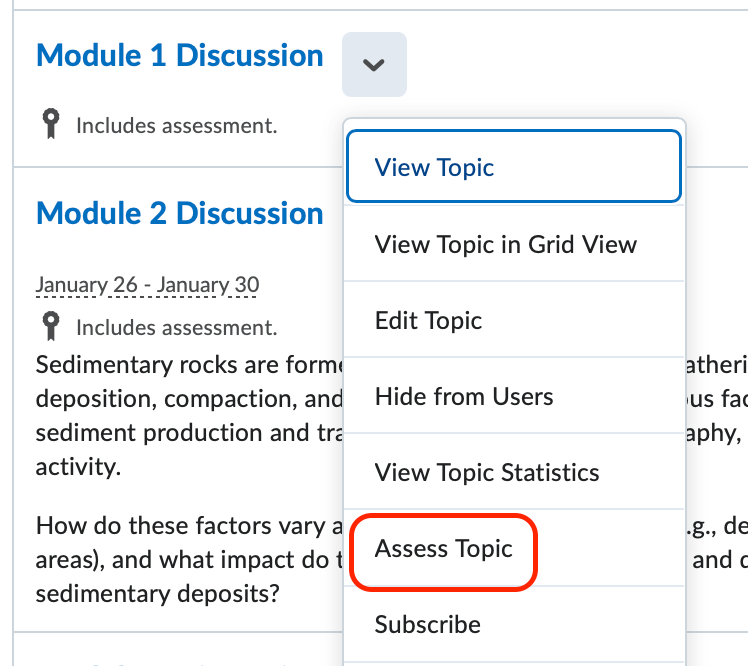
Grading a Discussion Board Topic
Grading Discussion Board Topics is achieved through the Assess Topic page. This page groups together all posts made by individual students so that an instructor may view a student's entire topic performance in a single window. Please note that it may be necessary to read through he discussion board topic in its entirety before trying to assess the students. This way, the instructor has the relevant contextual information necessary in order to rate the merit of student responses.
- From the context menu of a Discussion Board Topic, select the Assess Topic Option.
- Click on the Topic Score for a particular student. A pop-up window will appear that contains all of the student's
posts within a given topic.

- Scroll through the pop-up window to read the student's posts. Note that the default sort order is by Post Date.
- Enter a numeric score in the Overall Grade text box.
- Enter any feedback for the student in the Feedback text box.
- Click Update or Publish to save the grade and feedback for this student.

Additional Considerations for Grading Discussions
- Only published grades are able to be exported to the grade book. Students are also
only able to see published grades. Some instructors may choose to not publish a student's
score until scores for the entire class list have been recorded. Then, a final step
in this workflow would be to click the Publish All Feedback button located at the top of the Assess Topic Page.
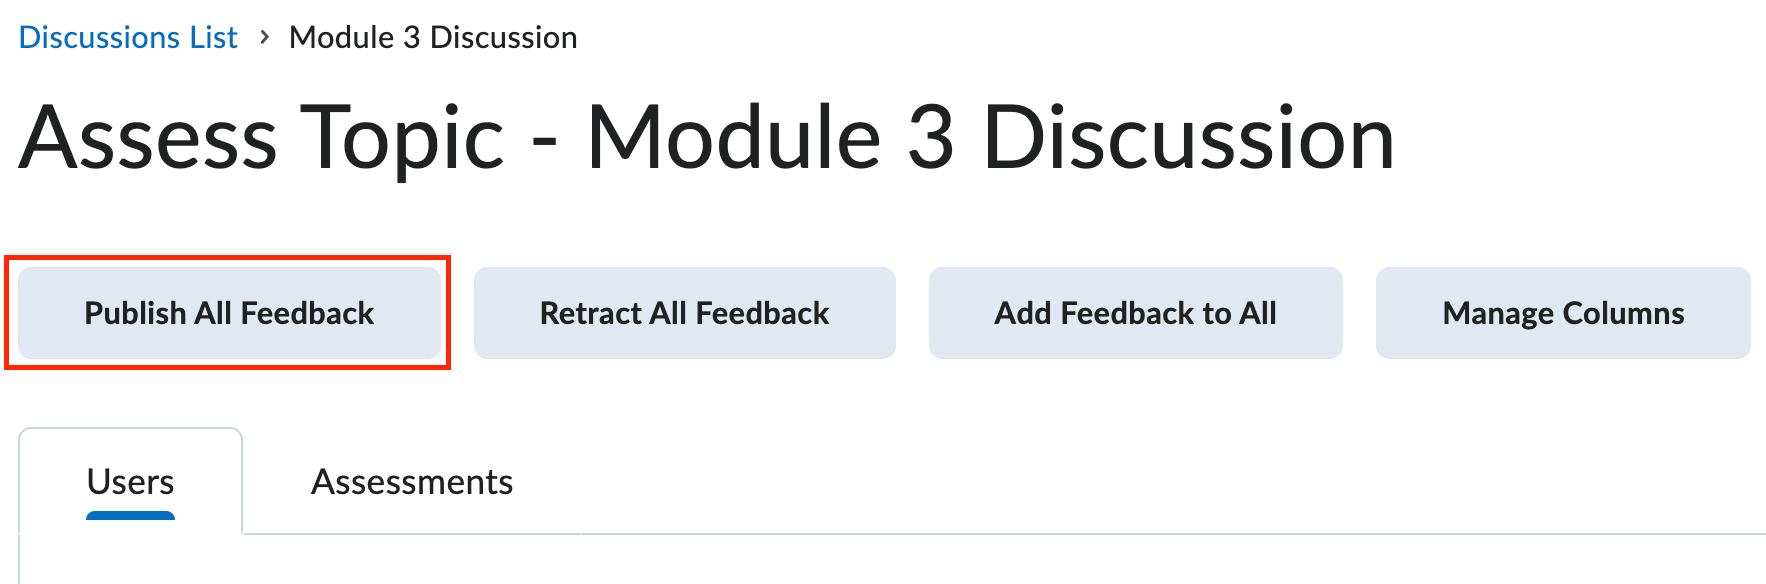
- Scan through the Status column on the Assess Topic page to ensure that all student grades have been published.
-
Discussion Views and Settings
Discussion Views
D2L supports two different views in the Discussions tool, Grid View and Reading View. Note: Reading View is the default but can be changed in your personal discussion settings.
- Grid View - Selecting this option will display the discussion posts in the traditional Grid
View, with post subjects displaying in a grid.
- This option is ideal if you wish to print and save specific discussion topics.
- Reading View - Selecting this option will display the discussion posts in Reading View, where the entire text of a post displays for all posts.
Follow these steps to configure your Default View in the Discussion Board:
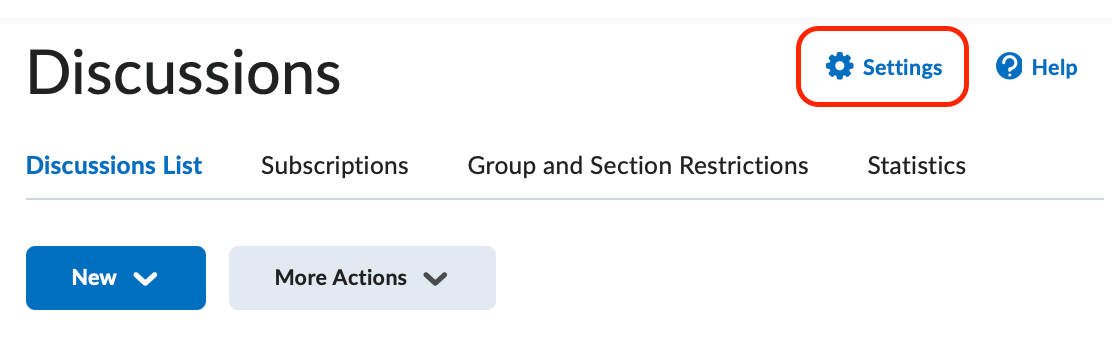
- Click Settings, located on the far right-hand side of the screen.
- In the Default View section, select either Grid View or Reading View.

- Click Save to save your changes and return to the Discussions List page.
Grid View Example:
Reading View Example:
Discussion Settings
Some features of the Discussion Tool can be changed on the individual user's view. Students can also change the way they view discussions. You can access these settings by clicking the Settings icon from within the Discussion Tool.
- Display Settings control how and what your Discussion board displays.
- Reply Settings give you the option to include the text of the previous message in your reply. This
resembles an email when seen on the screen.
- Please note that this preference is dependent upon the poster of the message. Inform your students if you would prefer they not use this feature.
- Org Unit Settings refer to settings you enable for your course. You can choose whether users can rate messages and if message descriptions are shown in the topics list. This option is also available on the topic level.
- Grid View - Selecting this option will display the discussion posts in the traditional Grid
View, with post subjects displaying in a grid.