Accessing The Dropbox
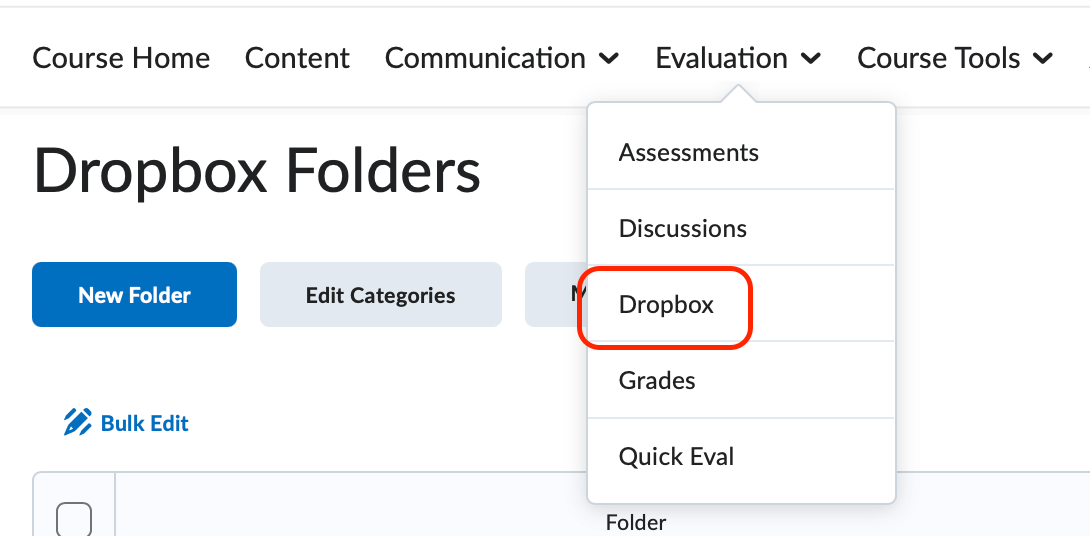
To access the Dropbox, select Evaluation from the default course navigation menu and then select Dropbox.
The Dropbox is a tool that will allow you to create folders to hold students assignments and submissions. The Instructor of the course is then able to view the submitted files and provide grades and feedback to the student all from within the Dropbox tool. To use the Dropbox you will first need to create Dropbox folders. Then, you can set up the various restrictions and conditions for each folder.
Creating Folders
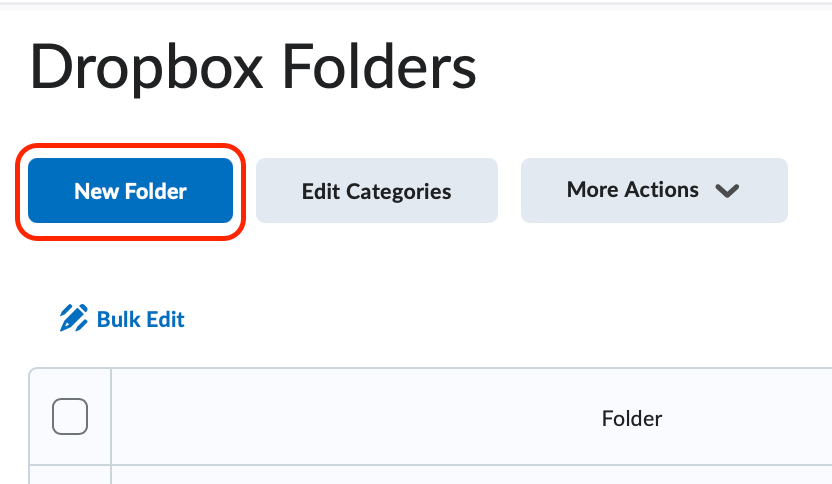
To begin creating a Dropbox folder, click the New Folder button on the Folder List page.
-
General Properties
General Assignment Properties
After clicking the New Folder button you will be brought to the Edit Folder Page. The main page holds your dropbox title, points, due date, description and attachments section. Populate all of the necessary fields on this page before moving forward in the dropbox creation process.
- Enter an Assignment Title for your dropbox. The title field is the only required field.

- Optional: Under Grade out Of, click on Ungraded and enter the number of points for the assignment. Then select the appropriate option.

- Edit or Link to Existing - if you have already created the grade item in the grade book or want to automatically create a grade item, select this option. Then select the radio button next to create a new grade item or link to an existing grade item.
- Not in Grade Book - this option will allow you to assess dropbox items without the grade counting in the grade book.
- Reset to Ungraded - this option will reset the dropbox to an ungraded assignment.
- Optional: Enter a Due Date and time for the dropbox. This due date will show up for students on the upcoming events section of the course homepage.
- Optional: Enter the assignment Instructions. We recommend adding all of the information regarding the assignment into the instructions box. Information populated in this area will display on the content page once the learning activity has been embedded into a content module.
- Optional: Use the Attachments area to attach any documents or information related to the assignment. This functionality
is a great way to include data files, assignment templates, or even assignment examples.
Please refrain from attaching a separate document that includes the assignment instructions.
Instead, place those in the Instructions box.

- Enter an Assignment Title for your dropbox. The title field is the only required field.
-
Availability Dates & Conditions
The Availability Dates & Conditions area houses all the information related to conditions that control a student's ability to see and submit assignments to an assignment folder.
- Optional: If you are planning on setting start and end date and time parameters, set the date
and time in the Start Date and End Dates section:

- Setting a Start Date will set the earliest date and time that a student can upload files to the dropbox folder.
- Setting an End Date will configure the latest date and time a student can upload files to the dropbox folder.
- When setting Start Dates and End Dates on a dropbox, you have additional availability
options to choose from. The following settings are available for both Start Dates
and End Dates.

- Visible with access restricted - The assignment is visible to learners before the Start Date or after the End Date, but they cannot open it or submit to it.
- Visible with access restricted - The assignment is visible to learners before the Start Date or after the End Date, but they cannot open it or submit to it.
- Visible with submission restricted - The assignment is visible to learners before the Start Date or after the End Date. Learners can open the assignment and read the description but cannot submit unless within the Start and End Dates.
- Hidden - The assignment is hidden from learners until the Start Date and time is reached and after the End Date and time have passes.
- Add Availability Dates to Calendar - this option have your start/end dates automatically synced to the course calendar.
- Optional: add a Release Condition to automate the visibility of the dropbox based on certain conditions. Visit the Release Conditions page to learn more about creating and managing release conditions.

- Optional: Set Special Access for a particular dropbox folder. This feature is helpful if a student has permission
to submit an assignment early or late. There are two options when setting up Special Access. Click on Manage Special Access.
- To begin, click on Manage Special Access. There are two options when setting up Special Access.
- Allow users with special access to submit outside the normal availability dates for this folder - Selecting this radio button will allow students with special access to submit to the dropbox outside of the regular restrictions you set previously without affecting the rest of the class and their access.
- Allow only users with special access to see this folder - Selecting this radio button will allow ONLY students with special access to submit to the dropbox outside of the regular restrictions you set previously. Your remaining classlist will NOT be able to access the dropbox.
- After selecting the access option, click on Add Users to Special Access.
- Next identify alternate due dates, availability dates and student(s) to which the dates apply.
- Click Save when done.
- Then click on Save and Close to save your special access options.
- To begin, click on Manage Special Access. There are two options when setting up Special Access.
- Optional: If you are planning on setting start and end date and time parameters, set the date
and time in the Start Date and End Dates section:
-
Submission & Completion
- Select an Assignment Type. The Individual option is the default and creates assignment folders where students submit their
own files and are assessed individually. *Note: You cannot change the assignment type of a dropbox folder once it is created.

- The Group option is used with you are utilizing the Groups feature within your course. The group option will not be available if no group categories exist in the Groups tool. Note that all students in a group are able to see their group members' submissions and students within a group will all receive the same grade and feedback.
- Optional: Select a Catgory or create a new category to better organize and manage your list of dropbox folders.
- Select a Submssion type - This option defines what students can submit to you:

- File Submission - The default setting. This setting requires students to upload a document or other file for an assessment. Selecting this option will allow you to limit the number of submissions a student can make, along with which submissions are available and the file types accepted.
- Text Submission - Select this option if students will be submitting links to external content or need to type in a response. For example, if students are submitting a video link, the text submission would facilitate this type of assignment.
- On Paper Submission - Select this option if the student is submitting an assignment outside of the learning
environment. Selecting this option will present several options for how the assignment
will be marked as completed: Manually by the student, Automatically on evaluation,
or Automatically on the due date.

- Observed in Person - Similar to the "on paper submission" this submission type allows you to differentiate between written assignments submitted outside of the learning and demonstrations, presentations, etc. Selecting this option will present several options for how the assignment will be marked as completed: Manually by the student, Automatically on evaluation, or Automatically on the due date.
- Enter an email address in the Notification Email field to receive an email message whenever a new submission is uploaded to this folder.
This option is only available for file and text submissions.

- Select an Assignment Type. The Individual option is the default and creates assignment folders where students submit their
own files and are assessed individually. *Note: You cannot change the assignment type of a dropbox folder once it is created.
-
Evaluation & Feedback
Settings included in this section control the grading mechanism for this assignment folder.
It is recommended that all required, graded assignment dropboxes be associated with a grade item.
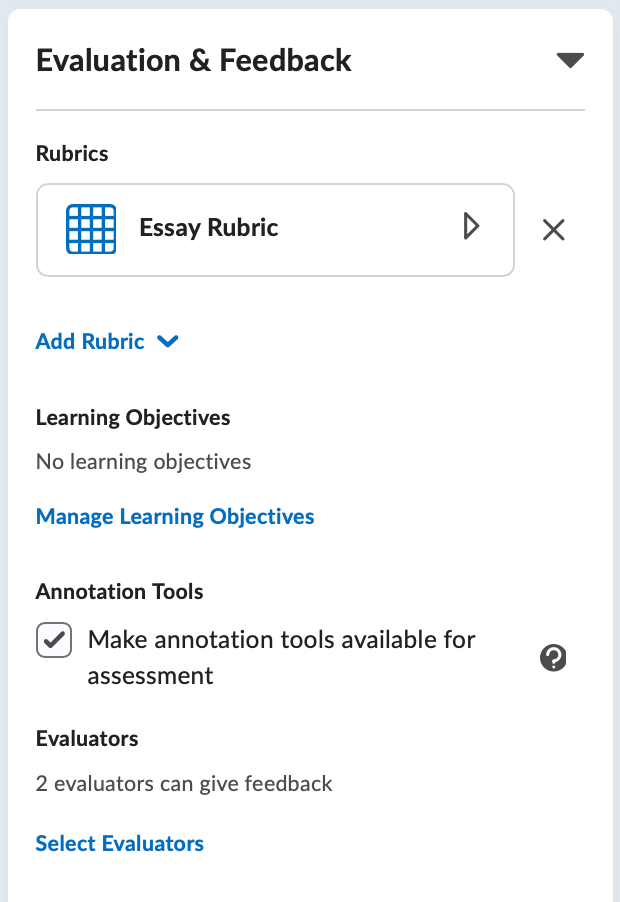
- Click the Add Rubric button to add a published rubric from the rubrics tool. Optionally, use the Create Rubric option to create a rubric for this assignment. It is recommended that you create and associate a detailed rubric that communicates the expectations for the assignment. Visit the D2L Rubrics Page to learn more about creating rubrics.
- Optional: Add Learning Objectives for the dropbox assignment. If you would like assistance with the Learning Objectives section, please contact D2L Faculty Support at 423-439-8611 or d2lhelp@etsu.edu
- Ensure the Annotations Tools option is selected if you would like to give inline feedback to student submissions.
- Optional: Click on Select Evaluators to allow others to co-grade student submissions.
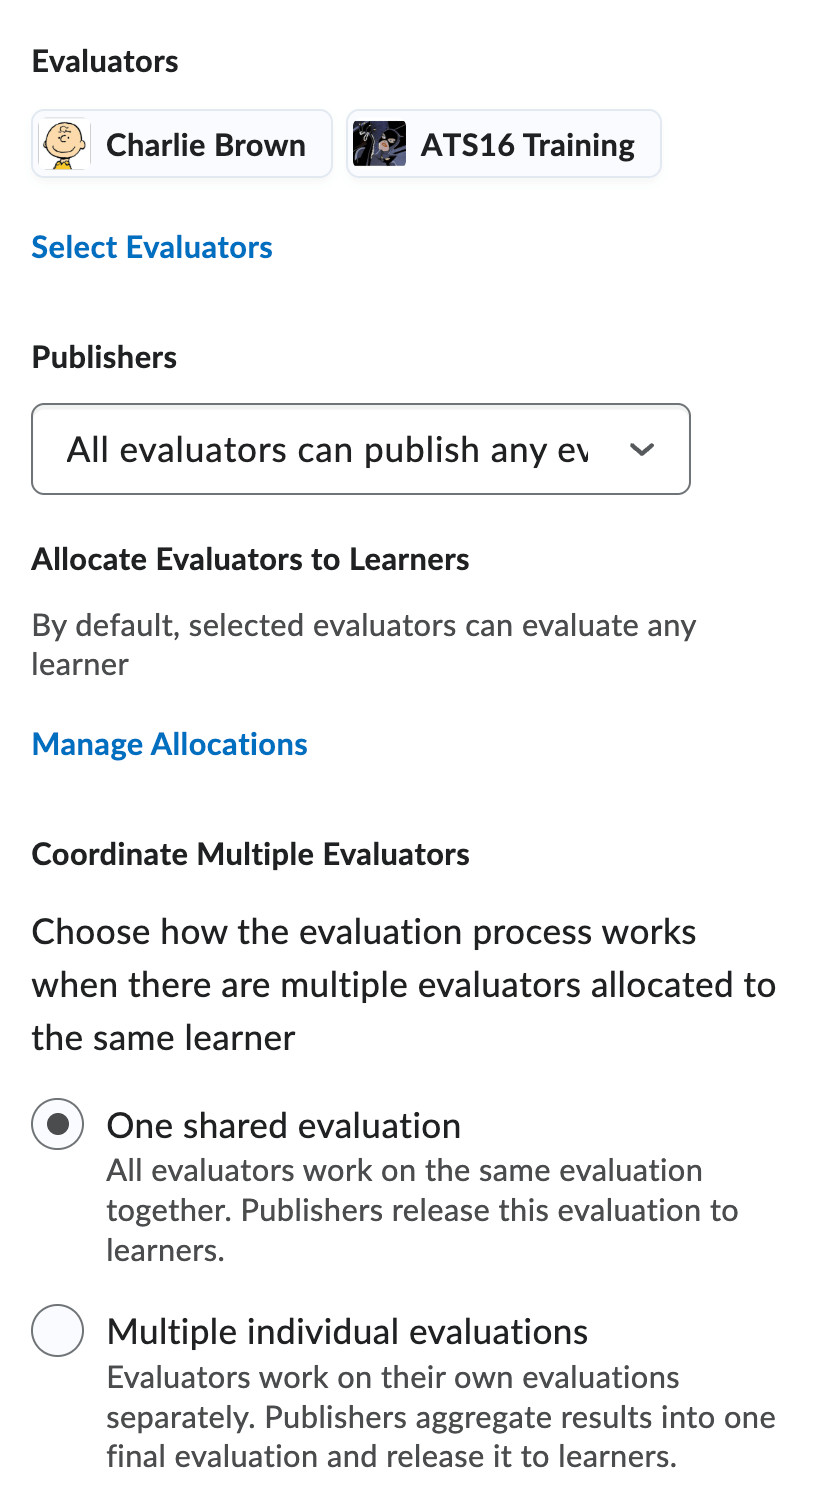
- The Publishers option allows you to choose the level of publishing (posting grades) privileges. By default, selected evaluators can evaluate any student. Other options include allowing evaluators to only publish their own evaluations or manually selecting specific publishers. Note: Publishers do not need to be evaluators.
- Manage Allocations allows you to edit the default setting of allocating each evaluator with every student. For example, you can choose to randomly allocate one evaluator to every student evenly. Click Apply Allocation Method and change your selection if desired. A pop-up window will appear if students are not assigned to an evaluator.
- For the Coordinate Multiple Evaluators option, the default is One shared evaluation. All evaluators work on the same evaluation. Each evaluator can publish and retract. You also have the option to select Multiple individual evaluations to allow multiple evaluations.
- Note: Once students submit to the dropbox, you no longer will have the ability to change the evaluators for that dropbox.
-
TurnItIn Originality Checking
Turning On TurnItIn
ETSU uses TurnItIn for assessment of orginality. TurnItIn can be enabled in the Evaluation & Feedback section of the dropbox setup.
- Click on Manage TurnitIn to begin the setup process.

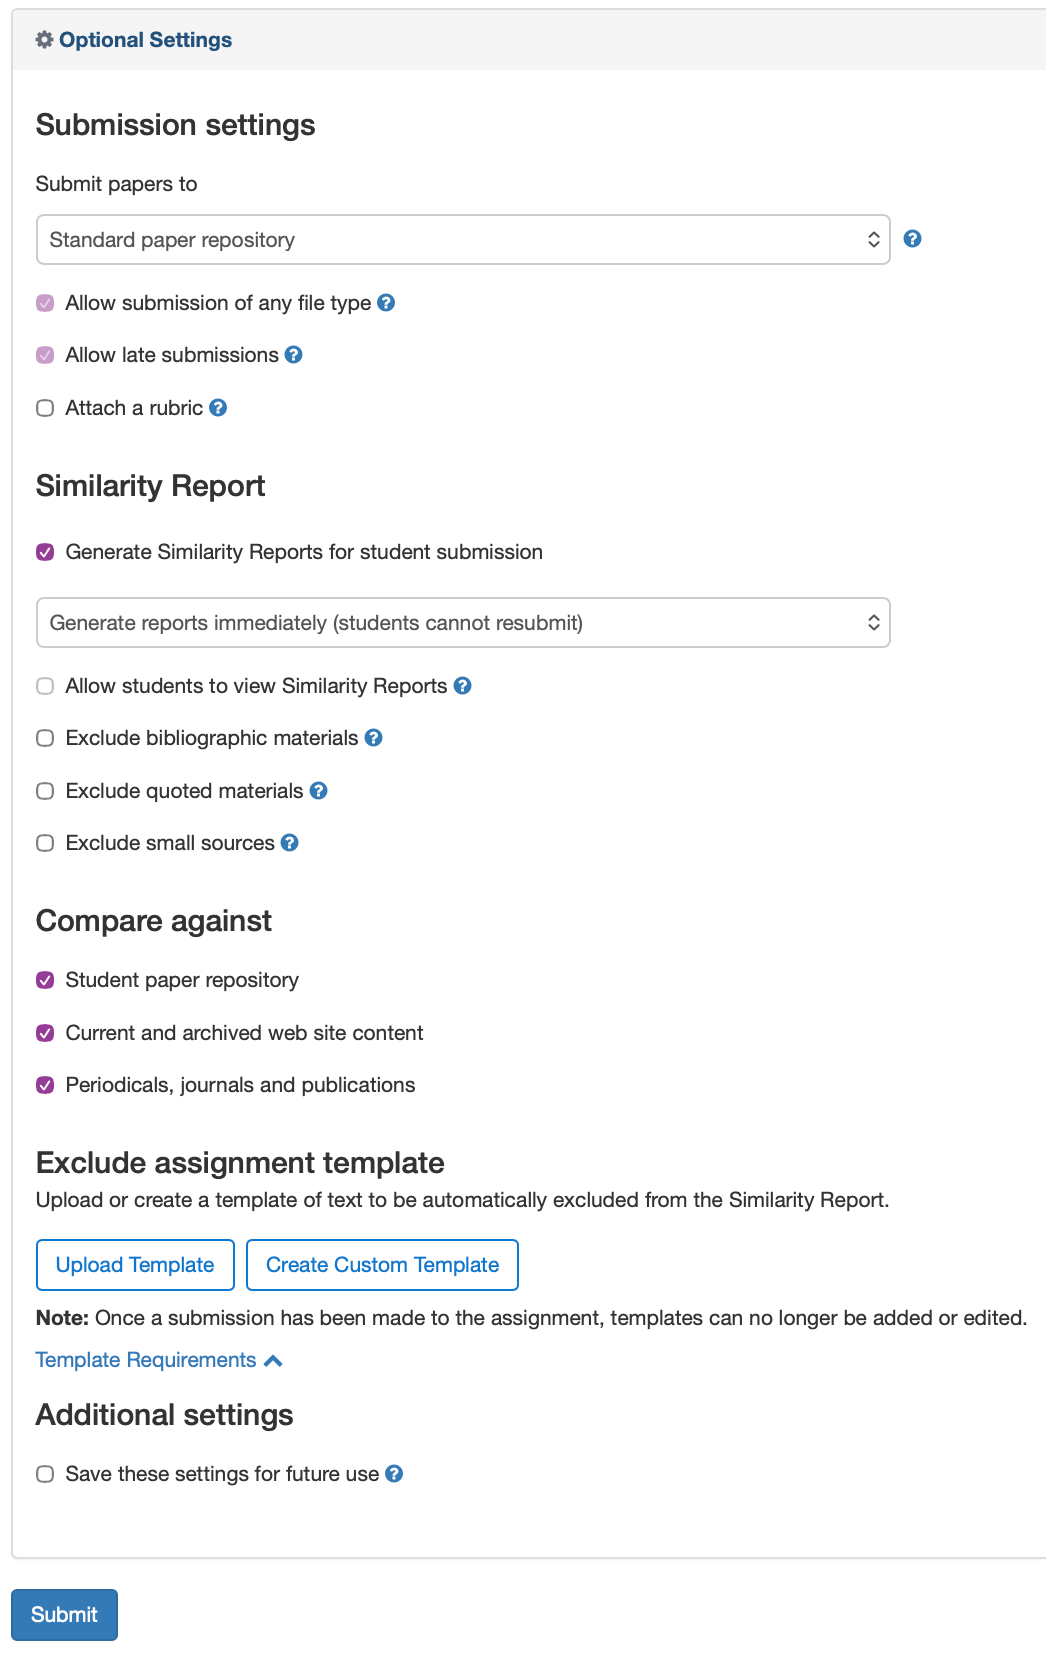
- Checking the box for Enable Similarity Report for this folder will turn on the TurnItIn originality check functionality for the assignment folder.
Checking this option will generate an originality score that is visible to the instructor.

- Optional: Check the box to Display option to allow students to view the originality score. Note that the display box must be checked in order for the students to access their TurnItIn reports in the Grademark platform.
- Submissions Checked option: Selecting Automatic originality checking on all submissions will send submissions to TurnItIn as soon as the student uploads the file(s). Selecting Identify individual submissions for originality checking will not automatically send files to TurnItIn. You must manually select and send the files to TurnItIn by clicking the box graphic on the Folder Submissions page.
- Check the box for Enable Online Grading for this folder to turn on the availability to use TurnItIn's Grademark platform to provide inline
feedback and grading.

- Transfer - you can select how you want your grades to sync back to D2L.
- Click the More Options button for several settings to help with manipulating how TurnItIn handles a student submission.
- Click on Manage TurnitIn to begin the setup process.
Managing Submissions
Clicking the folder name from the Folder List page will open a Dropbox Folder to view its submissions. Alternately you can select View Submissions from a folder's context menu. Either of these actions will direct you to the Folder Submissions Page.
-
Navigating the Folder Submissions Page
View By
The View By options give you the ability to view submission by group or by section. By default, this View By option is set to Users, which will list all students in the course. By default the Folder Submissions page displays everyone enrolled in the course.

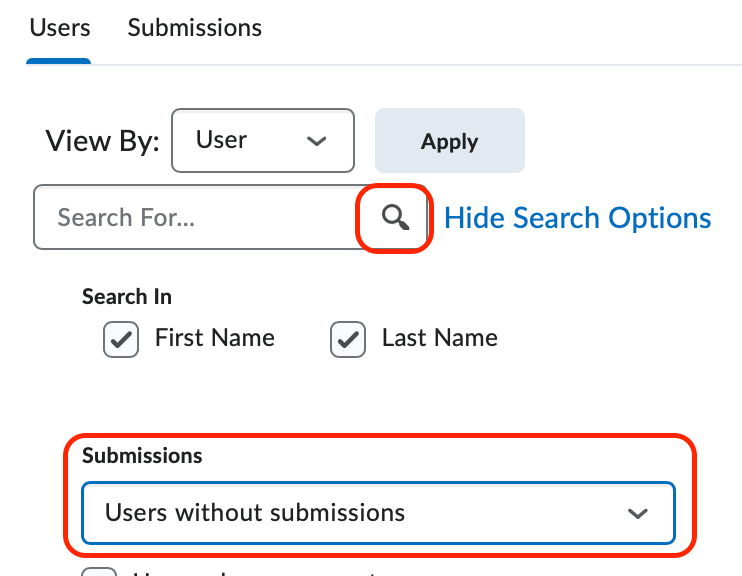
If you want to change your default view click on Show Search Options and change the submissions view. Note: If you change your view, you must then then the magnifying glass found within the Search For textbox.
The following additional Submissions options are available:- Show everyone (default) will display all students, regardless of submission.
- Users with submissions will display only students who have submitted a file to the dropbox.
- Users without submissions will display only students who have not submitted a file to the dropbox.
- Users with preview submissions will display only attempts made by you in the student preview mode.
- Users with ungraded unpublished submissions will display only students with feedback you have yet to publish.
- Users who are exempt will only display students who have been exempt from this assignment.
- Only show users with unread submissions will display only students with submissions marked as unread.
- Last Submission after will display students who submitted after a date you specify.
- Last Submission before will display students who submitted before a date you specify.
- Late Submissions will display submissions received after the Due Date you set in the dropbox properties.
- By Feedback will display based on the following options: Show everyone, users with feedback, users without feedback.
Submissions Table
The Submissions Table contains the students' files as well as action buttons that float along the top of the table. To use the action buttons, select a file or files by marking the checkbox(es) to the left of a student's submission and then select the action button.
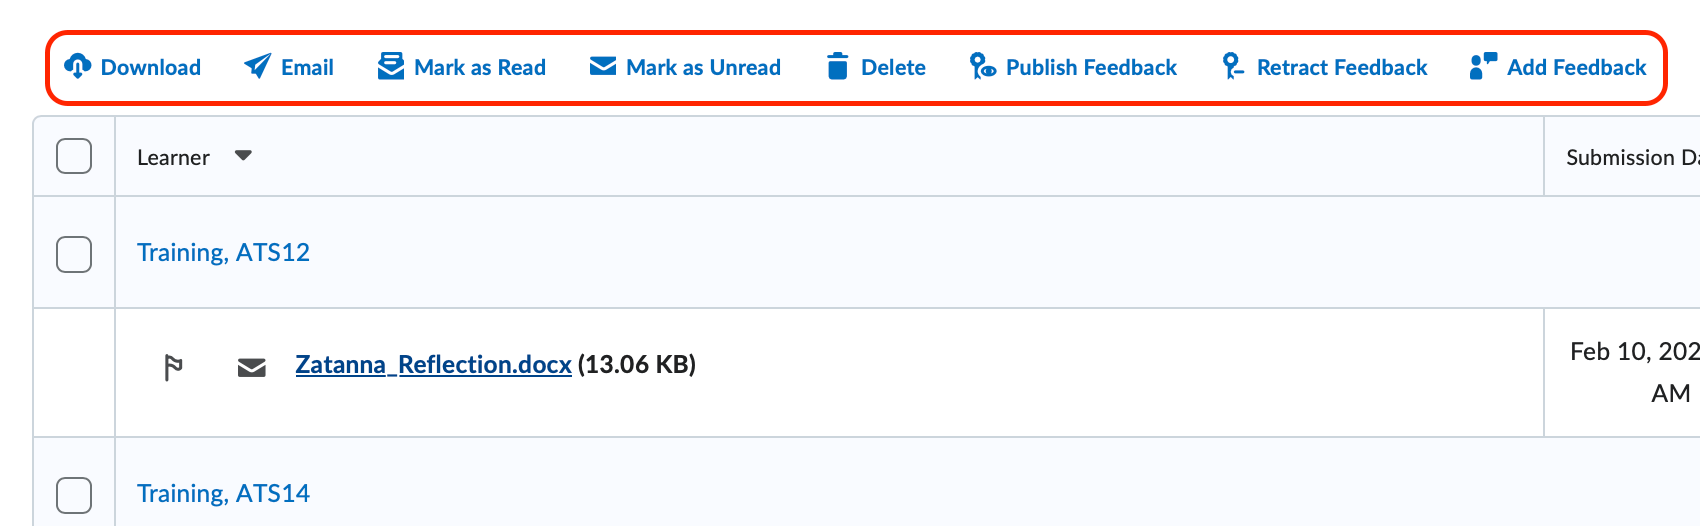
- Download will download all selected student files to your computer in a Zip (compressed) file format.
- Email will open a blank email with the students you selected.
- Mark as Read will mark all of the student submissions as read on the instructor Folder Submissions page.
- Mark as Unread will mark all of the student submissions as unread on the instructor Folder Submissions page.
- Delete will delete all selected student files.
- Publish Feedback will publish all scores and feedback for the selected students. If the dropbox is associated with a grade item in the gradebook, the score will also export to the gradebook.
- Retract Feedback will retract all scores and feedback for the selected students.
- Add Feedback allows you to add feedback to multiple selected students at the same time.
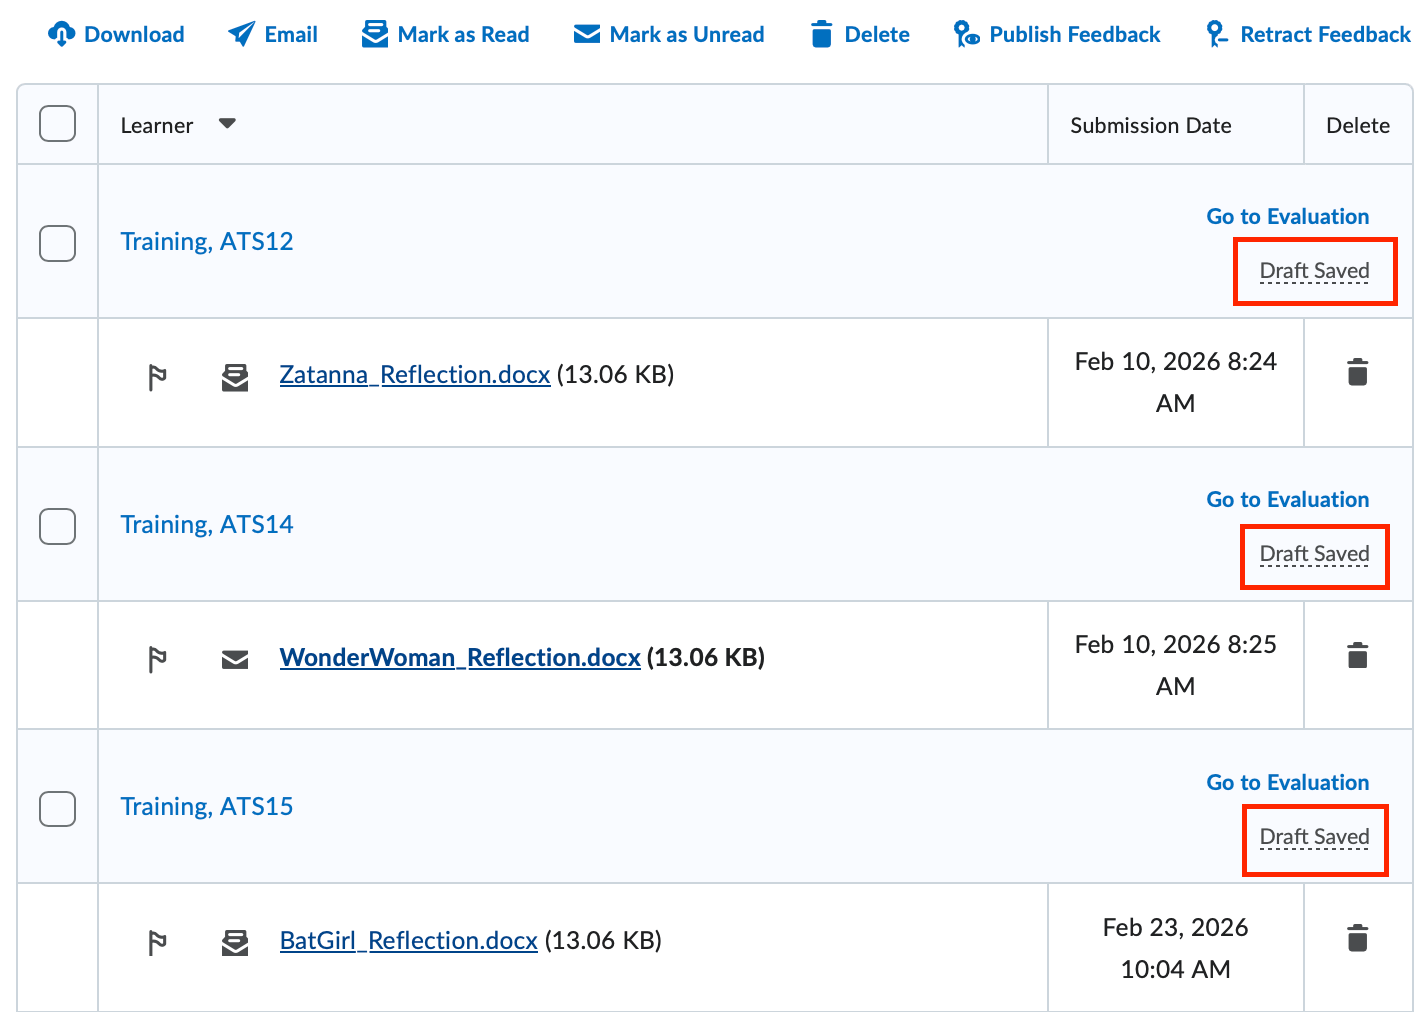
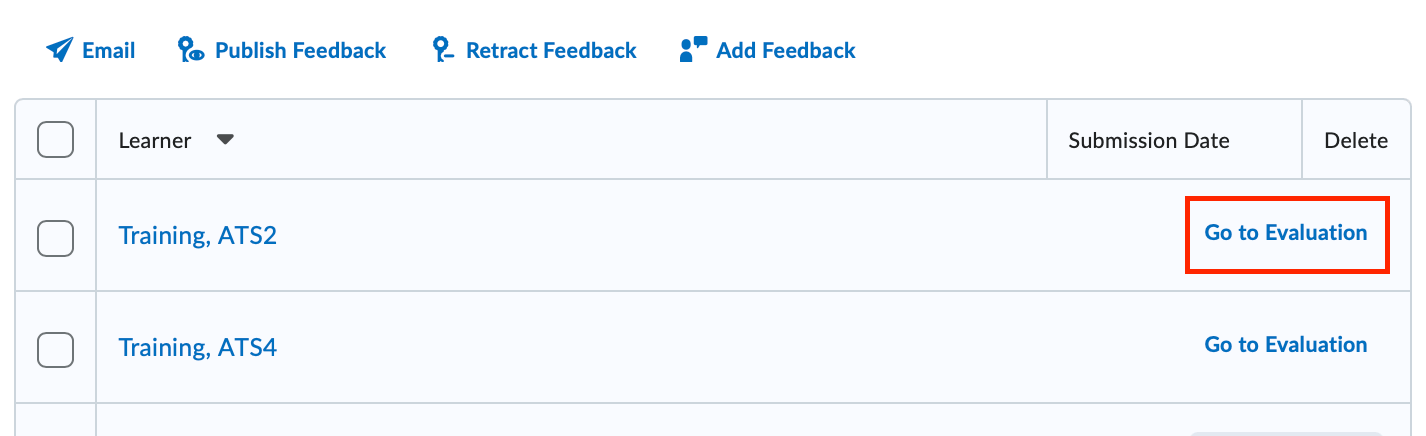
The Submissions Table also allows for an at-a-glance illustration of students with published feedback, with feedback still in the draft mode, and students who you have yet to evaluate.
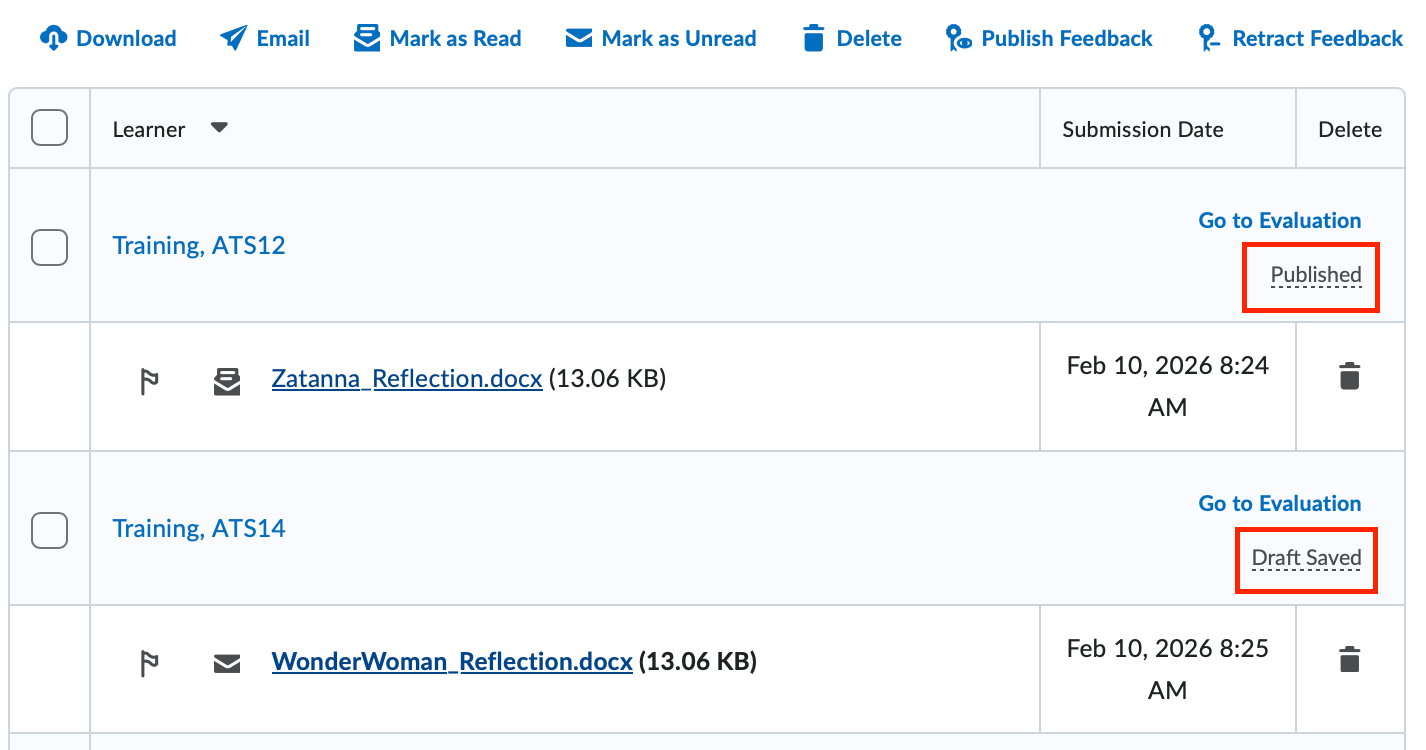
- Published signifies that an instructor has graded and/or provided feedback to the student and that grade and feedback is available to the student and, if applicable in the gradebook.
- Draft Saved signifies that an instructor has graded and/or provided feedback to the student but that grade and feedback is not available to the student or in the gradebook.
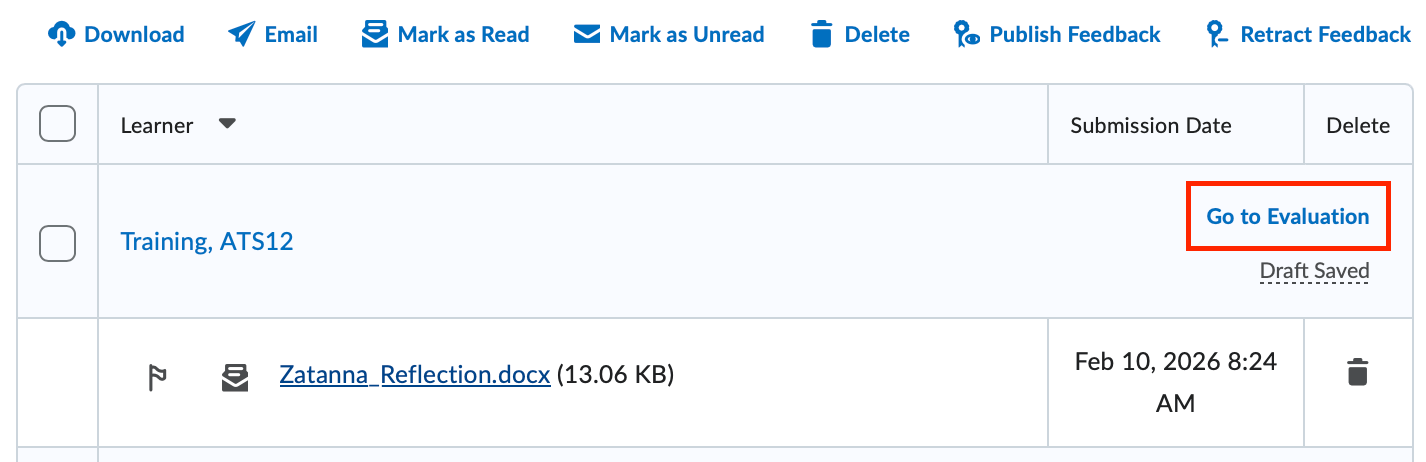
- Click on Go to Evaluation to view the student's submission to give grades and/or feedback.
-
Navigating the Evaluate Submission Interface
The Evaluate Submission interface is broken into two frames. The frame on the left displays the student's submission. The frame on the right contains the Evaluation section, which allows for an instructor to use a grading rubric, enter a student's score, provide feedback, and attach feedback files.
Clicking on a student file will automatically display the file within the Evaluate Submission Interface. Clicking on a student's name will display information about the student's file, but not the actual file itself.
The Submission Panel
The Submission Panel is located on the left-side of the Evaluate Submission Interface and has two different viewing options:
The Submission Panel can display an image of the student's file when you click on the file name.

The Submission Panel can also display information regarding a student's file when you click on the student's name.

- Clicking User Submissions will display a historical account of all files submitted by the selected student to the dropbox tool. Use the Folder Dropdown to toggle between multiple dropbox folders.
- Clicking the filename will display an image of the student's file.
- Clicking the Download All Files button will download the student's file(s).
The Evaluation Panel

Evaluation Areas
- Rubrics - If, in the setup of the dropbox, you associated a rubric with this dropbox folder, click the rubric name to expand the grading mechanism in the same window.

- Overall Grade - Enter a numeric score in the Overall Grade textbox. If the current dropbox is associated with a grade item in the gradebook, the name of that grade item will appear next to the textbox with a ribbon icon. Clicking on the bar graph icon will open the grade item statistics.
- Feedback - Enter any feedback into the Feedback textbox, noting that you have the ability to embed videos, hyperlinks, and other HTML content into this area. Note that, if applicable, any additional feedback entered on an associated rubric will automatically populate in this textbox.
- Add a File - If applicable, you may attach a feedback file(s) that only the selected student will see. You may attach multiple files. To remove an attached file, click the red (X) icon to the right of the attached file's name. If you follow the bulk download/upload bulk feedback workflow demonstrated in the following section, the feedback files will attach in this area.
- Saving Options - Select a saving option by clicking the appropriate button.

- Publish - Saves all scores and feedback, publishing the scores to the student and, if applicable, to the gradebook.
- Save as Draft - Saves all scores and feedback but does not publish the scores to the student or the gradebook.
- Update - Saves any new changes to published scores and feedback.
-
Downloading Submissions and Uploading Feedback in Bulk
If you are unfamiliar with ZIP (Compressed) files, visit the Microsoft Zipped Files website for more information on how to create and extract zip files. If you are familiar with ZIP files, follow the directions below to download dropbox submissions and upload feedback in bulk.
- From the Folder Submissions page, click the Select All Checkbox.
- Click the Download action button.
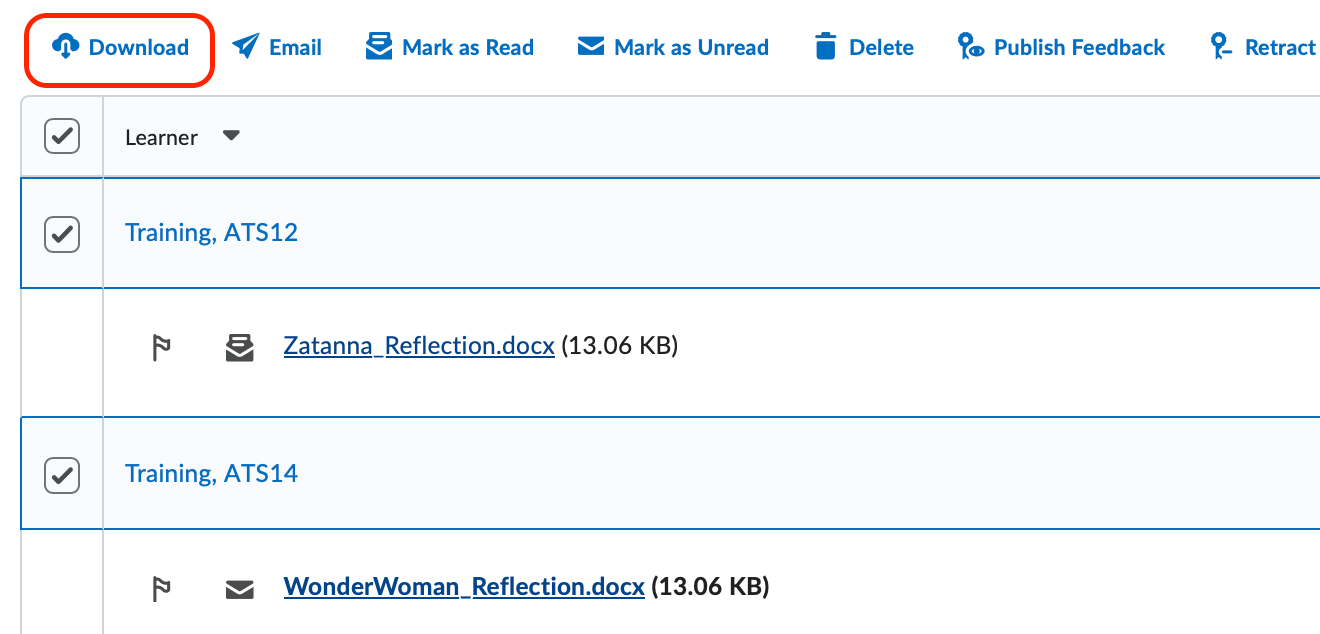
- A popup window will display when your zip (compressed) file is ready to download.
Click the Download button when the file has been compressed to download the file. This will save the
zip (compressed) file to to your computer. Note: Depending on your browser settings, this workflow may vary.

- Retrieve the zip (compressed) file from your computer and extract the file to show the multiple documents within it.

- Open the files in a word processing software of your choice. Typically, instructor use Microsoft Word and the built-in Track Changes feature. Make the appropriate editing marks and comments.
- Save the changes to each individual file without renaming the individual filenames. Note: that the prefix attached to each individual document file is actually a unique identifier used later in this workflow. Altering the individual filenames whatsoever will alter the workflow.
- Compress the individual documents into a new zip (compressed) file.
- Navigate back to the Folder Submission page of the particular Dropbox folder.
- Click the Add Feedback Files button.
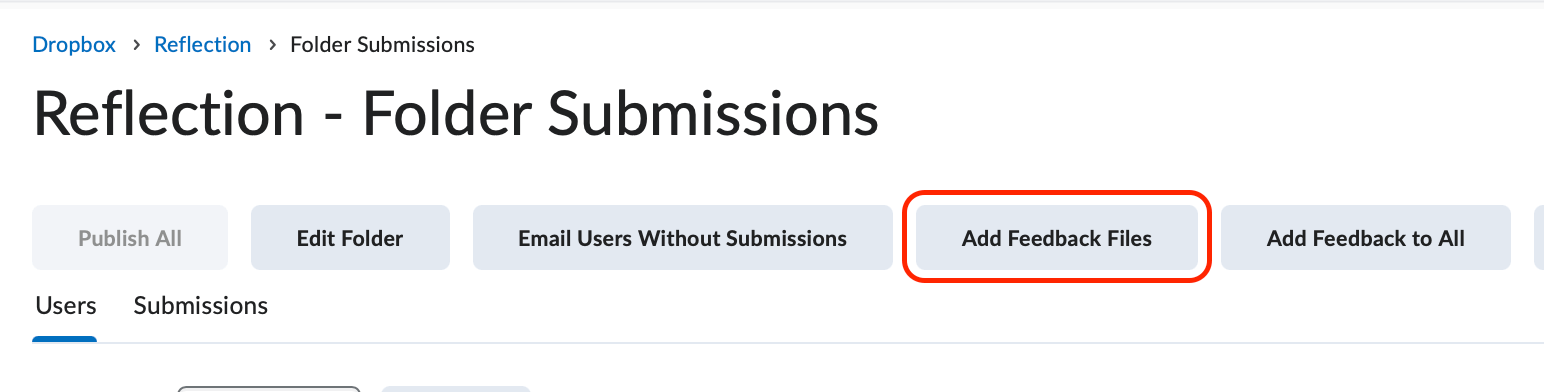
- Click Upload to locate the new zip file, select the file, and then add the file by clicking the
Add button. Alternately, you may add the individual feedback files in bulk by dragging and dropping the files into the Upload box. Note: that the individual feedback files must contain the numeric prefix in order for
the bulk attach process to work properly.

- D2L will extract the files and then attach those files to the appropriate student as a feedback file and update a student's report to Draft Saved.
- Click on a particular student's report link to view the drafted feedback file, enter any additional comments and/or grade, and then complete the workflow by clicking Publish. Repeat as needed for each student.
Grading Submissions
An instructor or grader can enter numeric scores and feedback for all students on the classlist, regardless of electronic submission or of a dropbox folder's association to the gradebook. If you would prefer that dropbox scores automatically export to the gradebook, consult the Creating Dropbox Folders for more information.
-
Leaving Feedback on an Ungraded Dropbox Folder
- From the Dropbox Folders List page, click the name of the Folder to view its submissions.
- Click the Go to Evaluation link to the right of the student's name.
- The Evaluate Submission page will be displayed where you can view the file name, comments left by the student, and the date and time the file was submitted.
- Rubrics - If you associated a rubric with this dropbox folder, click the rubric name to expand
the grading mechanism in the same window.
- Overall Grade - Enter a numeric score in the Overall Grade textbox. If the current dropbox is associated
with a grade item in the gradebook, the name of that grade item will appear next to
the textbox with a ribbon icon. Clicking on the bar graph icon will open the grade
item statistics.

- Feedback - Enter any feedback into the Feedback textbox, noting that you have the ability to
embed videos, hyperlinks, and other HTML content into this area. Note that, if applicable, any additional feedback entered on an associated rubric
will automatically populate in this textbox.

- Optional: Add a File - If applicable, you may attach a feedback file(s) that only the selected student
will see. You may attach multiple files.

- Optional: Add an audio or video note. Video Note is a feature in D2L that enables faculty to create and share brief audio or video recordings directly within the platform. This tool is particularly useful for providing verbal feedback, enhancing course content, or delivering announcements.
- Saving Options - Select a saving option by clicking the appropriate button.
- Publish - Saves all scores and feedback, publishing the scores to the student and, if applicable, to the gradebook.
- Save as Draft - Saves all scores and feedback but does not publish the scores to the student or the gradebook.
- Update - Saves any new changes to published scores and feedback.
-
Leaving Feedback on a Graded Dropbox Folder
- From the Dropbox Folders List page, click the name of the Folder to view its submissions.
- Click the Go to Evaluation link to the right of the student's name.
- The Evaluate Submission page will be displayed where you can view the file name, comments left by the student, and the date and time the file was submitted.
- Feedback - Enter any feedback into the Feedback textbox, noting that you have the ability
to embed videos, hyperlinks, and other HTML content into this area.
- Optional: Add a File - If applicable, you may attach a feedback file(s) that only the selected student
will see.
- Optional: Add a Video Note to share brief audio or video recordings directly within the platform. See more about Video Note
- Saving Options - Select a saving option by clicking the appropriate button.
- Save as Draft - Saves all scores and feedback but does not publish the scores to the student or the gradebook.
- Update - Saves any new changes to published scores and feedback.
-
Leaving Feedback For a Student Without a Submission
- From the Dropbox Folders List page, click the name of the Folder to view its submissions.
- Change the Submission dropdown menu to Users without Submissions or Show Everyone and then click the magnifying glass located in the Search For textbox.
- Click the Go to Evaluation link to the right of the student's name.
- The Evaluate Submission page will be displayed.
- Rubrics - If you associated a rubric with this dropbox folder, click the rubric name to expand
the grading mechanism in the same window.
- Overall Grade - Enter a numeric score in the Overall Grade textbox.
- Feedback - Enter any feedback into the Feedback textbox.
- Optional: Add a File or a Video Note for the student.
- Saving Options - Select a saving option by clicking the appropriate button.
- Publish - Saves all scores and feedback.
- Save as Draft - Saves all scores and feedback but does not publish.
- Update - Saves any new changes to published scores and feedback.
-
Grade Using a Rubric
- From the Dropbox Folders List page, click the name of the Folder to view its submissions.
- Click the Go to Evaluation link to the right of the student's name.
- The Evaluate Submission page will be displayed.
- Click the Rubric name to expand the grading mechanism in the same window. Visit the Rubrics page for expanded rubric setup information.
- Select a level of achievement for each criteria listed.

- Click the Add Feedback button to edit the default feedback.
- Overall Grade- The rubric's calculated score will populate in the Overall Grade textbox.
- Feedback - Any feedback entered on the associated rubric will automatically populate in this textbox. Enter any additional feedback into the Overall Feedback textbox.
- Optional: Add a File or Video Note if desired.
- Select a Saving Option by clicking the appropriate button.
-
Using Annotations
The annotations toolbar within the Evaluate Submission page of an assignment folder gives instructors and graders the ability to call attention to specific sections of a submission using digital comments, highlighters, and pens, just to name a few!
Several tools are available within the annotations toolbar. Clicking on the different utensil icons will display the pen, highlighter, eraser, sticky notes, text, and line tools that are available for use.

- The Pen tool allows you to draw, highlight text either freehand or by text, and erase. Using
the pen tool, you can draw on a student’s submission.

- The Note tool opens another toolbar which includes options to change Note color, shape, and
icon style. Using the note tool, you can add comments to different locations on the
document.

- The Text box tool opens another toolbar which includes options to format the text (size, font,
color) and align it top, center, or bottom to leave comments on the page. Enter your
comments and then single-click outside of the commenting textbox to save your changes.

- The Line tool allows you to insert lines, arrows, and rectangles arrow text. Use the line tool to
underline and point things out in the document.

- To delete an annotation, single-click on the annotation to select it. Then, using the context menu that appears, click on the trash can icon to delete. You will be asked to confirm your action.
Note: Annotations save automatically. So, you shouldn’t have to worry about losing your work!
Remember to use Chrome of Firefox to ensure the best user experience with this functionality.
- The Pen tool allows you to draw, highlight text either freehand or by text, and erase. Using
the pen tool, you can draw on a student’s submission.
-
Publishing Grades and Feedback
- From the Dropbox Folders List page, click the name of the Folder to view its submissions.
- In the Submissions table, identify the student's with feedback saved that you would like to publish and place a checkmark in the select checkbox to the left of the student's name. Click the first box to select all students on
the page.
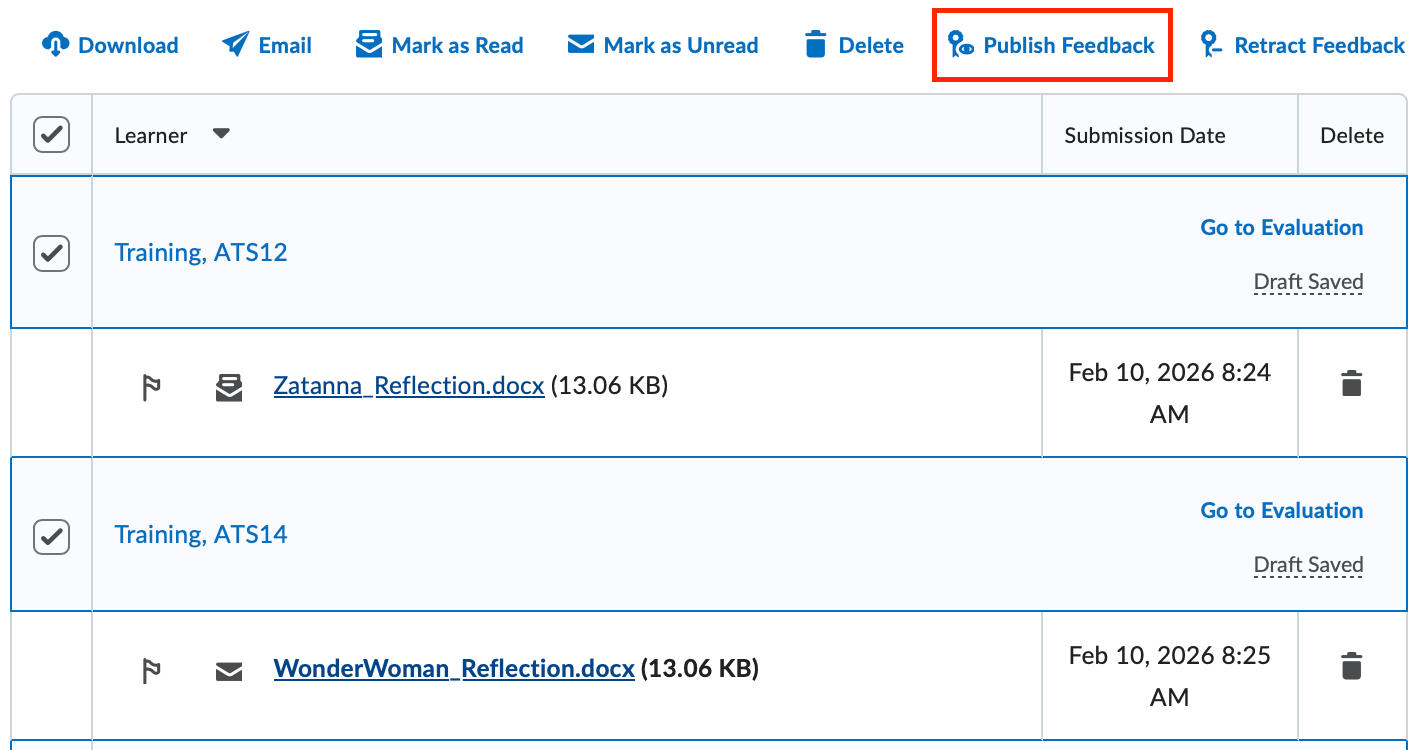
- Click the Publish Feedback button.
Managing Folders
-
Reorder Dropbox Folders
Control the order your dropbox folders appear with the Reorder option.
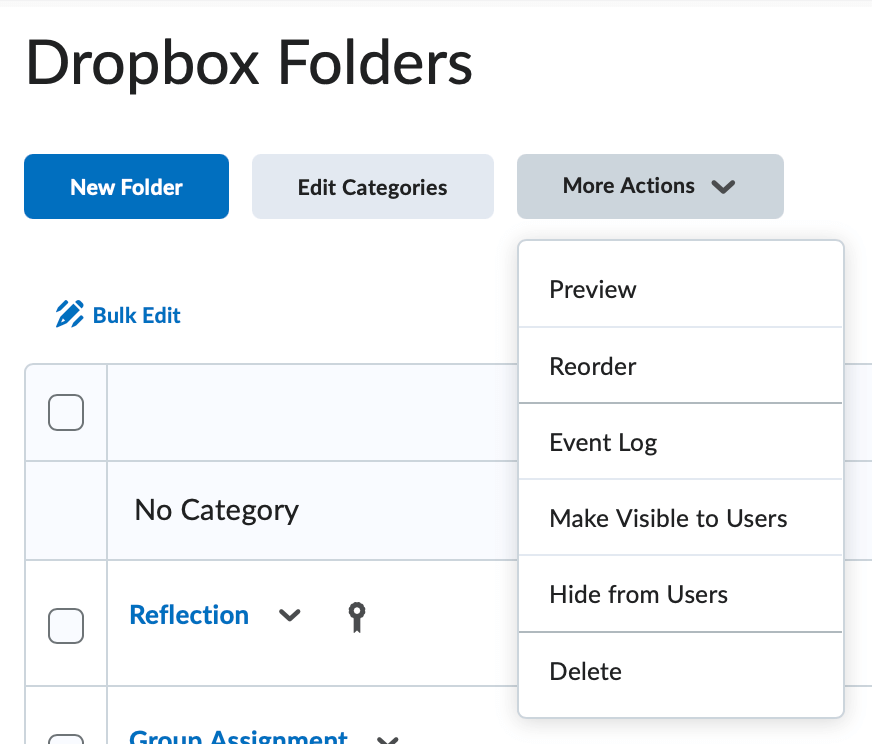
- From the Folder List page, click the More Actions button and select Reorder from the dropdown menu.
- Select a number in the in the Sort Order dropdown. Note that the sort order will dynamically update with each sort order number
you select or change.
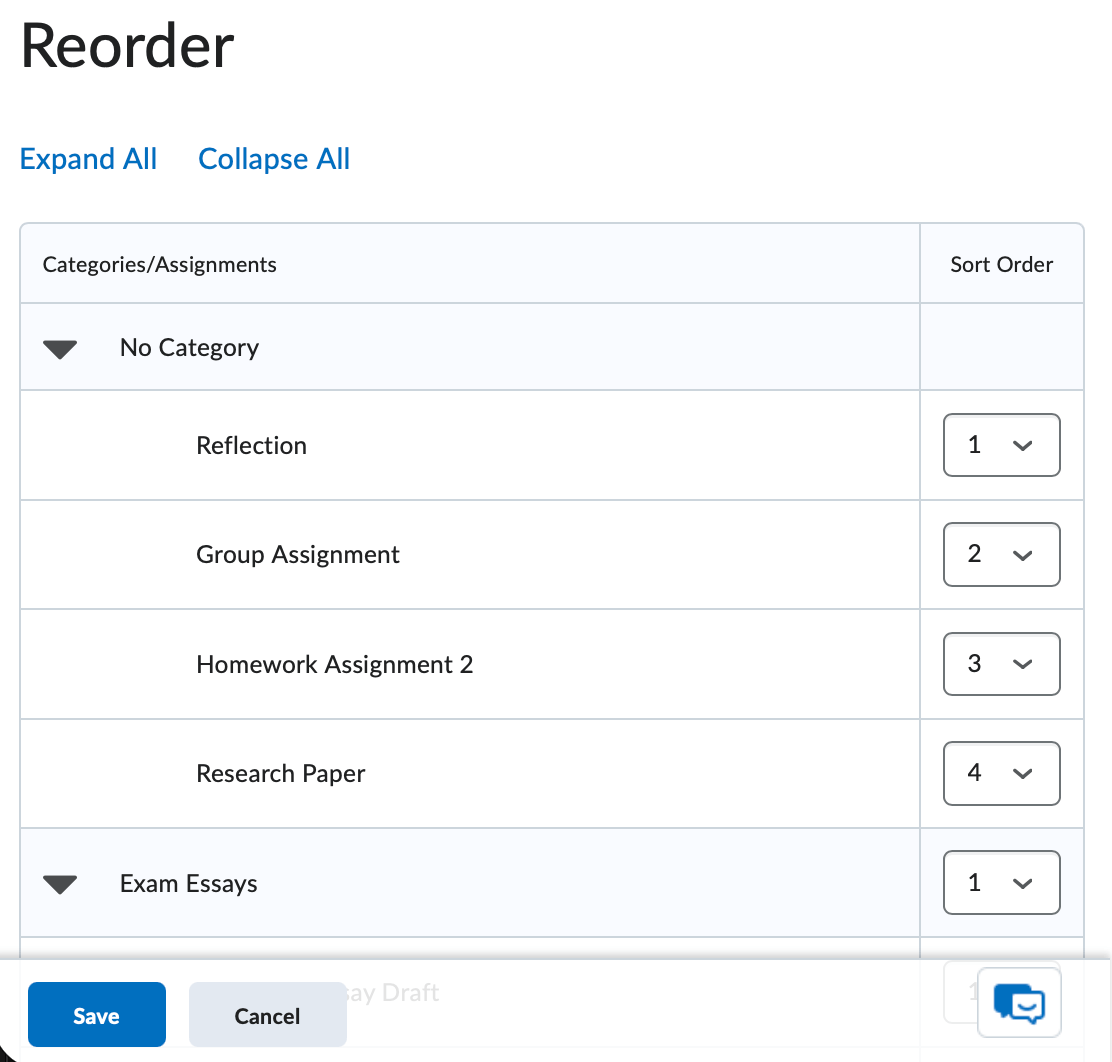
- Click Save to return to the Folder List page.
- From the Folder List page, click the More Actions button and select Reorder from the dropdown menu.
-
Delete Dropbox Folders
Delete a dropbox folder by using the Delete feature.
- From the Folder List page, click the More Actions button and select Delete from the dropdown menu.
- Mark the checkbox of the folder or folders you would like to delete.
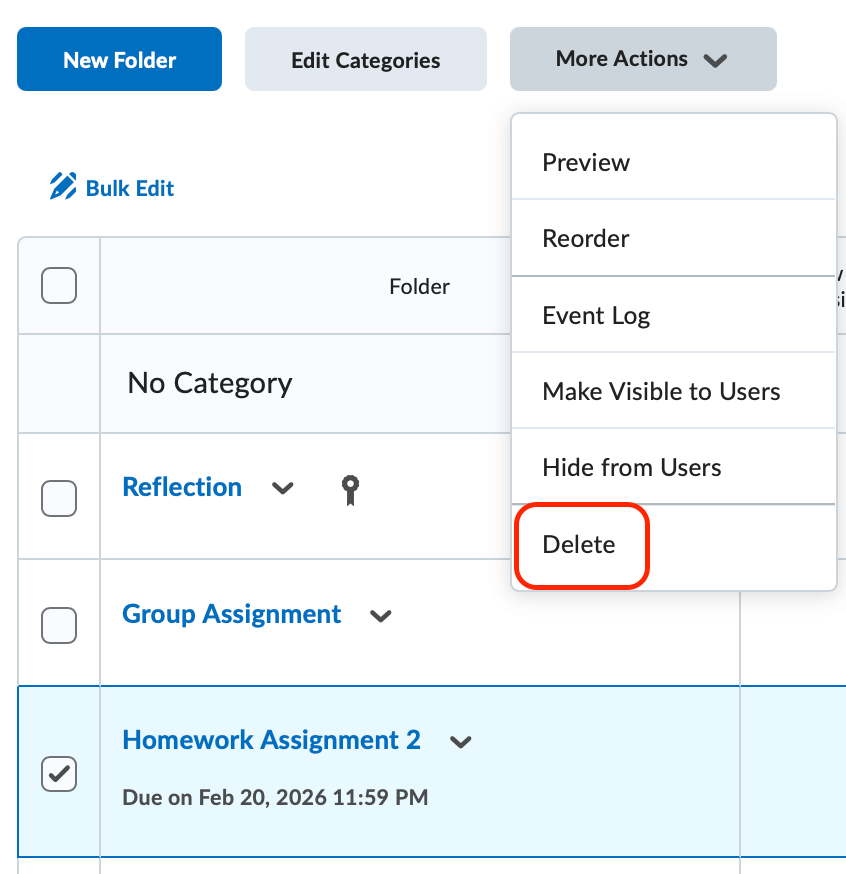
- Click the More Actions button.
- Select Delete from the dropdown list.
- Click Delete on the confirmation pop-up window.
- Click Cancel to return to the Folder List page.
- From the Folder List page, click the More Actions button and select Delete from the dropdown menu.
-
Restore Deleted Dropbox Folders
If you have inadvertently deleted a dropbox folder, use the restore action to reverse the deletion.
- From the Folder List page, click the More Actions button and select Event Log from the dropdown menu.
- Locate the Dropbox folder you would like to restore, noting that you may have to navigate through multiple pages of deleted folders.
- Click the Restore button.
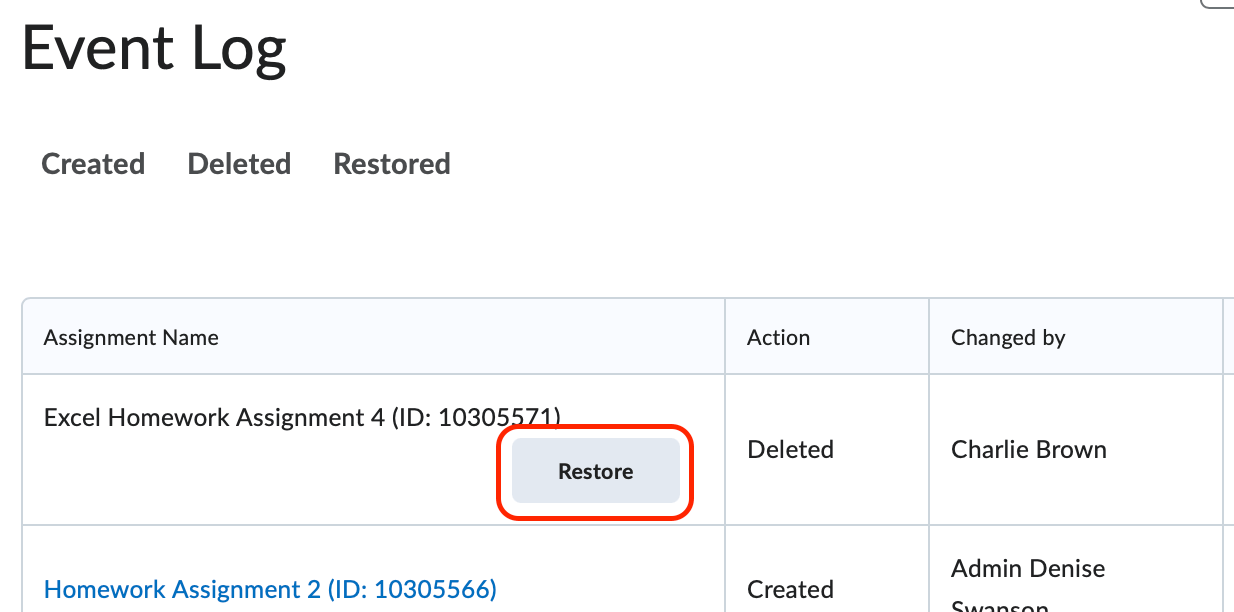
- Look for the confirmation popup to appear at the bottom of your browser window.
- Navigate back to your Folder List page by using the breadcrumb trail.
- From the Folder List page, click the More Actions button and select Event Log from the dropdown menu.